close

debjit

Technology

How To Get Anyone’s IP address?

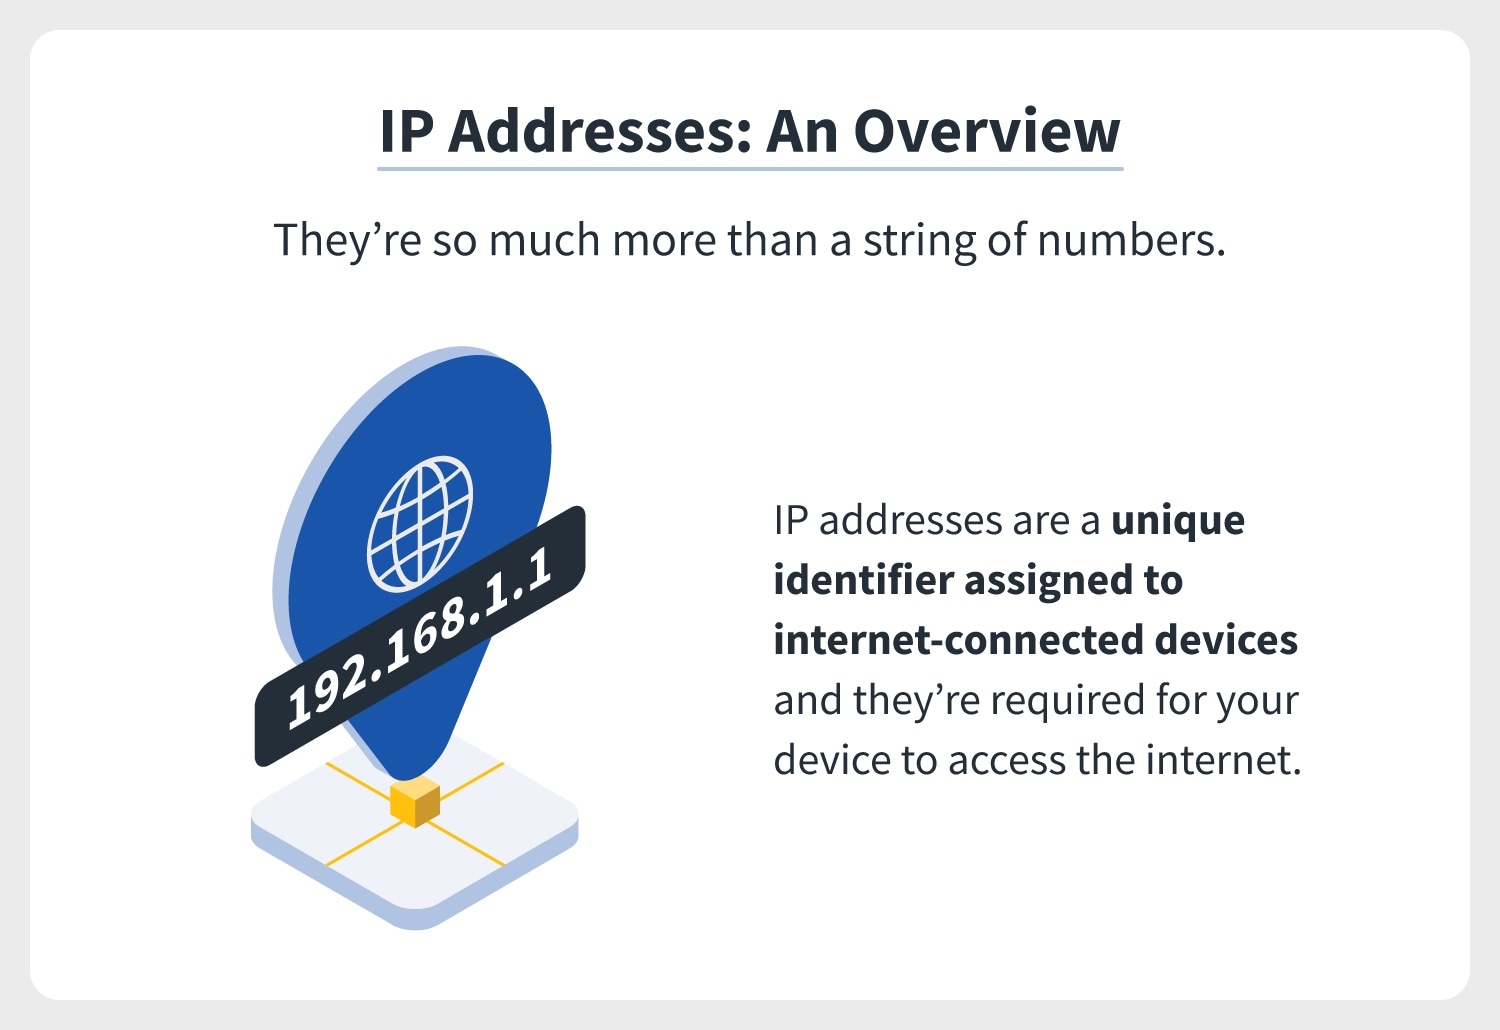
IP address means the Internet Protocol address which is one of the logical identities against any website. But for the purpose of user comfort, we generally use the domain name for any website. The domain name is basically easy to remember by everyone. But the IP address is a little bit tough to remember as it only consists of numeric numbers. Every system which is present in the source as well as destinations definitely contains the IP address. Through this, we can able to detect anybody’s PC easily. As we already told this is one of the important identities for your PC in which network you are connected.

What is an IP address, how is it used and where to find yours

Now here in this topic, we will tell you the process that how to get anyone’s IP address by following the actual techniques. Yes, if it is about techniques then there are many techniques available to get the IP address.  But you just need to know the actual workable techniques through which you can able to get that particular IP address of any PC. Follow the text that we have mentioned here about the process of how to get anyone’s IP address in a proper way.

Why do we need to get anyone’s IP address?

The IP address is created on anybody’s PC while they keep connecting with any of the modes of the Network. With the help of this IP address and default gateway, the destination PC will connect with us easily.

While we get to connect with other’s PC it is found that sometimes the hackers from the destination grab all the information from our system.  While we are both connected to the same network, it becomes easy for them to hack another PC easily. Depending on this situation we need to get that PC’s IP address to trace or get the identity of that hacker.

In the next step, we will discuss the techniques that how to get anyone’s IP address in a proper way.

The Processes: How to get anyone’s IP address?

Now here we will show you the three types of techniques that will definitely help you to get anyone’s IP address. The techniques and steps are generally applicable to any Windows PC. All these methods are totally tested and applicable to your advantages.

Here we have listed and described the three ways to get anyone’s IP address using the preferred steps:

·      Mail IP Address:

If you want to check the IP address against any mail which is spam for you. Those emails are generally sent by unknown users or hackers to your PC. The programming is created in such a way that while you open the mail, they can start to grab the information of your PC. So always try to ignore those emails. Now start knowing the process to get the Mail IP address of anyone.

  1. Suppose you have an account in Microsoft Outlook and you have received an unwanted email in your inbox.
  2. To start to investigate the IP address of the email that is sent to you, first you need to open the messages header.
  3. Open the message then click on Actions where you will find a drop-down list and click on Show Header details.
  4.  Now you will get the IP address which you need to copy to the clipboard first.
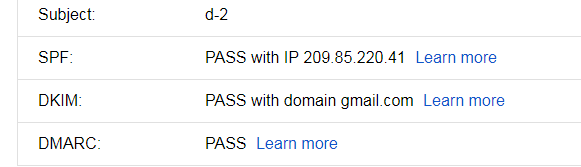
  5. For GMAIL you need to open the message Click on More Action in the right top corner and choose Show Original. Copy the displayed IP address in the same way.  
  6. Now paste that IP address into the internet tools like IP Look Up to check who the owner is or what is his identity in real life.

·      Any Website IP Address:

The next method is to get the IP address from any Website domain. This is not so much complicated if you follow the correct process from the points given below. Let’s have a look at those specific steps given below.

  1. At first, the user needs to open the command prompt software on their PC. To open CMD, click on the start button and search with the keyword Command Prompt.
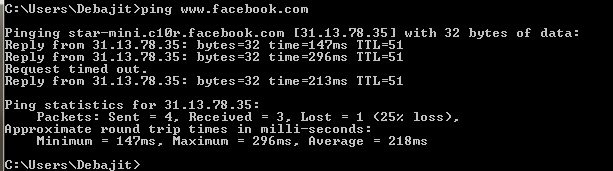
  2. After opening the command prompt console you need to ping the site by writing the command “ping domain name”. If you want to ping Facebook then you need to write “ping www.facebook.com” and the hit ENTER button.
  3. That’s all the details will automatically start to display on the CMD panel. From there you can check the IP address including the amount of packet sent and loss during the time of ping.
  4. Repeat this process to find the IP of any websites.

·      Using Traceroute:

Another best and easiest way to find out the IP address is Traceroute. This is the way that will show you the path of the IP address easily. The process may take some moments to grab all the information and display the data on your panel. So have a look at the steps to using the Traceroute command in Command Prompt.

  1. Similarly, as we tell you before the process to open the Command Prompt panel you need to open it first.
  2. After opening the CMD panel type the code tracert IP Address (e.g.: tracert 192.10.1.1) and hit Enter – for Windows only.  For UNIX, Linux, and Mac you need to type the code Traceroute IP address (e.g.: Traceroute 192.10.1.1) and hit the Enter button.
  3. That’s all the data will start to display accordingly.

That’s all about the steps how to get anyone’s IP address with information easily. These all are the proper steps which we will recommend you to look for IP address. Besides these methods, if you feel comfortable with others, you can choose them. Hope you all are satisfied with the information we have given here about getting the IP addresses of others in various ways.

read more
Game

How to Block Ads in Android Games, Apps, and Browsers?

On-screen Mobile Ads are too annoying when they display while playing games, using apps, and surfing the internet. Sometimes accidentally clicking on these ads may insert viruses on your device as well. To get rid of these types of Ads you need to get some solution against that. Here we will provide you with the total guidelines and the complete solution to avoiding these types of annoying ads displayed on your phone. Sometimes it is to be said that using third-party apps may bring these types of ads to be displayed on your phone. But no if you use genuine apps also you can get annoying ads from some sites too. So for both rooted and unrooted phones, our solution will work out definitely.

How to Block Ads on Android: Easy Tips and Tricks

The procedure which we will mention below is applicable to your Android phones. So generally there are some add blocker apps present for your Android device. Besides the titles, and descriptions of the ad blocker apps we will give you the proper links to download and install the files online. Let’s start to discuss the free download ads blocker apps that help you to block ads instantly.

How to block Ads in Android Games, Apps, and Browsers using an Ad blocker?

Here you can find some of the most popular and useful apps to block the annoying on-screen flashing ads instantly. So go through the title of the Ad Blocker apps and get them now on your Android phones and tablets.

·      Adblock Plus

Adblock Plus is a very useful and secure app for Android through which you can block the ads displayed on your browser while surfing the internet. To download this app you need to click on the link given in the title name. It also comes up with its browser to get an ad-free experience during internet surfing time.

·      Ad-free

This is another APK file that will help you to block the ads on your Android phone. So go through the link from the title bar and select the option “Download Adfree”. Check for the Ad-free. APK and install it. Make sure your phone installation from Unknown sources is enabled from the phone security settings. Now open the app after installation click on “Download the host” and wait. Now reboot your phone once and thus your phone is totally free from Ads.

·      AdAway

 Another ad blocker is the AdAway app which is also available in the APK version to install it. So first, you need to click on the title link to download this app and install it on your phone. You need to enable the Unknown Sources option from the phone security settings before installing it. Once the installation has been completed now open the app and click on “Download files and apply ad blocking”. Now go back and take a rest until the work and procedure have been completed successfully. That’s all you are free from now.

·      Install DNS66

Without draining your battery and making extra effort you can simply block the ads on your Android device. Go through the title link and you will reach the main site. Select the link “download APK” and the downloading will start. After completing the download click on the APK file and press to install when prompted. That’s it after installation it will block your ads.

Now open the app and enable the domain filtering. Now enable the AdAway host file only from the list by tapping on the red dot from the left side. Now it will turn into a green color. Now go to the start stop bar from the bottom menu and press refresh on the top of the screen. Now you will see one screen pop up that the host’s file is downloading. When done click on the power on of button on the middle of the screen. Then the VPN service will activate and hence it starts to block the ads.

·      Xposed Module

This is another module to block the app on your phone while playing games, using apps and using the internet. Just click on the above link to download the file now.

Now you need to install the Module MinMinGuard which will work for you. So click on this LINK to download and install the app on the same process. But the latest compiled version you can download from HERE.

Now open the Xposed and open the modules. You will see the name of MinMinGuard now hit the check box and then reboot your device. Open the App again after restarting open the modules and click on MinMinGuard. A list will display where you get the installed apps and now select the apps from which you want to block the Ads. That’s it you are done now.

Besides these procedures, you also can block ads in other ways. But they will not work at all well for you. So these are some of the best genuine free ad-blocking apps that you can try securely will no issues on your phone to block any types of ads displaying on your phone. These apps are totally tested on devices and thus recommend for you all. Hope you will get a safe use of your mobile phone from these annoying ads which are always displayed on your phone. From any type of app, you will get blocked from displaying apps on your phone. So go through the above steps to install them on your phone now.

read more
General

5 Best Data Backup Tools For Mac

Losing of Data from our device is very much common and faced by many users at all. If we want to keep our important data safely in our Mac, Windows etc. devices then there are various procedures to apply it. If you use those procedures then it will be very helpful to you all to keep your data very safe as always. Sometimes it was too late that we did not have back up our data and the drive crashes suddenly. In that case we need not to wait for tomorrow and try to back up the data now. Here we will only tell you all about that how to back up data in Mac OS for MacBook only.

Best Mac backup software 2025 | Macworld

To back up the data in Mac OS we will recommend you all 5 best tools only. Those tools will acts like software and you can choose any one of them for back up your data accordingly. There are various features available in these data back-up apps. Currently if you did not using any app then go for these from the list mentioned below.  Now we will start to discuss about the details of these apps which you needed in below.

Complete Details about 5 best data backup tools for Mac:

Before using any back up tools or apps in your MacBook it is very important to know some details about it. Depending on the advantage of users we are going to mention all the possible details you all need against every 5 best tools below.

Crash Plan:

Initially we are going to talk about cloud based Cash Plan back up tool for Mac OS. This is one of the most popular and best tools for data recovery in Mac PC and you can also use it for Windows and Linux too. There’s a free version of this tool is available in which you can create your own local disk to save or back up your data safely. In free version you need not to depend for the cloud for back up your data. Even there is procedure for performing the automatic regular based back up as well.

You own PC will act as a back up storage for your data. If suppose you do not have your another PC or friends PC local to you then using the remote access you can also back up those PCs data. In this way you can easily create the off-site data backup for your computers. Also the free version of the crash plan tools supports the incremental and full backups with the process of file encryption as well. Do the automatic daily based regular backups by attaching your external hard disk drive with your Mac PC.

Super Duper:

Super Duper is another data backup tool for Mac OS. This tool supports both the incremental and full back up process as well. Features like creating clones and keeping back up are totally free and in paid version you will get some advanced features. Advanced features are set up schedules for automatic back up for clone creations, automatic updates, etc. So if you are using the advance feature then you can easily set up or create your customise back up schedule and routines as well.

This is a very good data backup tool for Android. One of the most unique features provided by this Super Duper tool is that it will create bootable clone of the start-up drive which some other tools are unable to perform this operation. The interface of the Super Duper tool is very much easy to handle and such that any Mac user can perform the operation easily.

Time machine:

Another back up tool for Mac OS which is already come up integrated with OS X 10.5 (Leopard) or later version is Time Machine. This is a very useful back up tool for the Mac PC which is very easy to set up and use. If the user wants to perform the regular based back up process then once you need to set up the process. After creating a single set up then the task will automatically perform by the time machine regularly. So you need not to take any tension regarding the scheduled back up process.

It also helps you to the process of migrating data from one Mac PC to another with proper back up and security. If you are getting all these features in a single back up tool then we will recommend you to go for this tool definitely.  

Carbon Copy Cloner:

From the name of this app it is clear to many users that this is a backup or cloning kit for Mac. This is one of the most favourite apps for the Mac community users. If you want to get data backup tool with overall features for your Mac then Carbon Copy Cloner is the best choice for you all. This app primarily comes up with 30 days trial period and if you want then you can purchase also for a lifetime use. This app is specially used to create up the start-up bootable files clone.  Besides these you can create the incremental and full back up too.

The process of downloading and installing the carbon copy cloner for your Mac is too much easy to perform. You just need to download this tool from the official site of carbon copy cloner and install it directly in your Mac PC. That’s it now you can easily enjoy the service of back up your data safely and securely.

Mac Backup Guru:

Mac Backup Guru is another backup tool for Mac which is especially important for the purpose of cloning only.  This tool actually helps you all to create the exact copy of the selected drive which you want. For example if you want to back up your start up drive then after the back up those files or data will work as your bootable drive only. All the features of the backup tools are almost same but some special features are also provided by the Mac Backup Guru for Mac users. The features like syncing the folder data and making a new clone, incremental cloning etc. are available.

If you want then you can automate your backups by using the full scheduling systems. Thus the Mac Back Guru will help you all to create the current the backup clone for your essential data.  This app is so much secure and safe and thus it will not lose you any data during the back up.

So these are not the end as there are many other tools or apps available for Mac data backup. Those five tools which we have listed above will the details are the best choice for the users. We will recommend you all to choose any one of the above apps for your Mac PC to create a secure back up. Other tools like, Idrive, get backup, etc. are also available in market for your Mac PC. Hope you have understood about the tools which we have described above. If you want any one of the tools then please visit the official sites of every tools by typing the title name of the tools directly on Google.

read more
Technology

How to add a new user to Linux?

As we know that Linux is one of the best Operating System for Professionals. Using this Operating system we can able to create the service PC, various applications, software, etc. and much more. But do know that without creating any user it is not possible for us to use the system through Linux OS. By default, we generally create the root user account while installing the Operating System on the computer. This root Operating System will act as an admin account also. Here we will show you how to add a new user to Linux OS.

The process to create new user Linux OS is not so much difficult to perform. But there are many processes available which you can choose to add a new user to Linux. This topic is completely based upon the process through which you can able to create a new user in different basis. According to your need, you can choose the number of users you want to create than applying to make the changes.  Just you need to follow the steps carefully for adding a new user to Linux Operating System. Let’s have a look on the process steps to create or how to add a new user.

The complete guide about how to add a new user to Linux:

You have reached to the actual section from which you can able to get know how to add a new user to Linux. The user needs to follow the steps very carefully and apply the same on your PC to make the changes. Make sure you have installed the Linux Operating System properly in the PC in which you want to add a new user. Two processes are basically there to create or add a new user. They are

  1. Using User Manager
  2. Using Shell Prompt

[i.] How to add a new user to Linux using User Manager?

At first, we will show you the steps to create a new user to Linux OS with the help of graphical User Manager. Follow the steps properly given below:

  • At first, the user needs to go the main desktop screen where you will find the option Applications which is situated on the main menu of the panel. Now navigate through the System Settings and then the Users and groups from the panel.
  • In substitute of the previous step, you can also open the User Manager by using the Shell Prompt. Just open the Shell Prompt and type the code redhat-config-users.
  • Suppose you are not log in as a root (admin) then it will ask you instantly for your root password. Otherwise, it will open the User Manager Windows here.
  • While the User Manager Window has opened on your screen you will find an option Add User at the top of the user manager interface panel. Here you need to click on the option Add User. This interface is also known as Red Hat User manager.
  • The new window of Create New User will open where you need to enter the new Username first. Username can be a nickname or the abbreviation or full name of the user for whom the account is created.
  • After that enter the Password which may be asked for two times to verify properly. After making the input you need to click on Ok button. Thus new user which you have created is listed on the user list. Thus the process of user account creation via User Manager is complete.  In this way, the user can able to add more account on the list for another user too.

[ii.] How to add a new user to Linux using Shell Prompt?

Another process to add a new user to Linux Operating System is by using the Shell Prompt application. This already comes in build with Linux Operating System which is a console to execute the commands. Using the shell prompt you can able to add or create a new user for a system. Let’s have a look on those steps to create or add a user to Linux using Shell prompt.

  • At find, you need to open the Sell Prompt application on your PC.  Make sure you are login with the root account of your PC. If not then just type the command su and then enter the root account password.
  • Now type the command useradd and then put a space and then type the user name with which you want to create the new account. Like useradd mchristopher and hit Enter button.
  • Next type the command passwd followed by a single space and then type the username again. Like passwd mchristopher.
  •  Now at New password quickly input a new password and presses Enter.  Again on Retype new password enters the same password again.Thus you have confirmed your new password with the newly created username. Keep in mind that always tries to use a combination of the alphanumeric password while you set any security passwords.
  • That’s all you are done.

These are all about the process how to add a new user to Linux. If you want to does the same task then choose the process which we have discussed above according to your comfortability. Hope you all are satisfied with the information which we have provided here about to create a new user for Linux. Be careful while you are doing these task on your system as if you applied any wrong step then it may harm your PC software or Hardware too. So, before applying the above processes read them out carefully. Thus there will be no chance to harm or create any malfunctioning on your system.

read more
General

hello Network APK Download

To share your interest and connects with various friends and favourite ones you can use the hello Network. The“hello Network” app is basically developed by the creators of social networking site named Orkut.com. Simply say hello with various peoples and this app will help you to create a feed of your favourite contents. You can view the contents according to your choice shared by various peoples and aligned in a series which you’re really cares about.  This is a social networking app but you will feel something different experiences in this app. You can daily meet with new peoples from across the world by sharing your creative ideas, opinions, creations, experiences etc. Apply your own interest based filters to view the most important contents which even need in your first choice. Get connected with individual members of hello Network and start a conversation with them to share your opinions and views. You can also leave a simple comment after every post thus it helps the others to get or knows about your personal likes and dislikes.

According to your interest evolves with time, the hello Network also encourages and grows with you. In this content you can get the ideas about the features provides by this hello Network and also gives you the full details about downloading and installing the hello Network APK in your mobile phone.  

How to download hello Network APK in your Android Phone?

To download the APK file of hello Network in your Android phone you go through the below steps which will help you get this app easily in your smart phone.

  • User should initially need one Android phone with minimum 1GB RAM and Android version 4.4 and above to run this app smoothly in your device.
  • Now open up your phone browser or any other installed web browser like Google Chrome or UC browser in which you need to search with the keyword “hello Network APK Download” and wait for the search results.
  • After getting the search result you need to open the latest and up to date links and click on the download button to start the downloading.
  • Once the downloading has been completed, the hello Network APK file will save in download folder of your phone memory or external SD card.

To download the latest version of hello Network APK file from third party site you can Click Here.

How to install the downloaded APK file of hello Network in your Android Phone?

To install the hello Network APK in your phone from the downloaded APK you need to go through the steps which have been described below.

  • To install this app from downloaded APK file in your phone first you need to enable the installation from Unknown Sources. Because by default due to system security and privacy the app installation from third party site remain blocked from the settings.
  • So you can enable or unblock that feature by opening the Phone Settings->Security and Privacy

->Unknown Sources->Enable.

  • Now open the APK file from the download folder of phone memory or external SD card and then click on the file to start up the installation process.
  • The installation needs some permission to access your device contacts, media, files etc. which you need to allow for completing the installation process.
  • Once installation has been completed, now you can open and start the app from your app drawer and enjoy it after the first sign up.

To install the hello Network app directly from the Google play then you go through this Link.

Features of hello Network app –

Before using any application you must need to know about all the features which will provide by that preferred app. So, to get aware about all the best features of hello Network app you need to read the below points completely –

  • Join our new community or create your community to share your passions with others.
  • To reflect your passions you can get over 100 above interest based personas.
  • This is an easy way to explore you by searching new friends or members who even wants to share their interests.
  • This is a better way to increase your personality through online process and helps you to connect with other users.
  • Built up your reputation by creating and attain your status within your personas.
  • Expand your horizons and share the same passion can easily discover each other so that you can become a part of that community.
  • On the top navigation menu you can get the icon of your communities and so that you can open them instantly.
  • Browse for various communities and select your best choice that sparks up your interests.
  • Create your own community and add peoples who want to share the same ideas and all.
  • Give a title name of that community and describes that with proper pictures and text contents.
  • Broadcast your community and tells everyone by saying hello to all.
  • See the various peoples and know that what communities they are belongs from.
  • This is a perfect place to meet various peoples and say hello to all.
  • Give comment on others post such that they can get to know you are also interested in their contents.
  • Like those posts which belongs like your same category.
  • You can use full size HD images in your post such that your community members get more interest in your post.  

We know that online social networking is very helpful for us to instantly share our ideas and thoughts with others which are better than offline mode. So with the help of hello Network also you can share your interests, thoughts, feeds etc. with others and also get know what another users wants. Hopefully this content helps you to provide all the useful information about this beautiful social networking app. This app mainly helps all the users to share their ideas, experiences, opinions etc. with each other by meeting with new trends of peoples from across the world. We have already provided the official link to install this app from Google Play and also to download the APK file from third party site.

read more
General

Best Music Library Music Stores In iTunes.

Listening music is a type of passion for maximum peoples across the world. Presently a large amount of music library we can get or access through our smartphone only. Among them, some users are there who generally uses the Android devices and some other uses the iOS devices too. But here we will only discuss the music library or music stores which you can easily use in your phone beside the iCloud Music. As we know that iCloud is the dedicated music store app which is developed by Apple Corporation. If you store your music in iCloud Music library then it will easily accessible from any iOS devices or Mac or PC. Thus it helps you to save your phone or device memory from being occupied by music tracks.

Here in this topic, we are going to discuss the best music library music stores in iTunes to download for free. There are various music stores apps available in iTunes which you download and install on your iOS devices for free. The main benefit of these apps is that you can search for any latest and old popular songs for free and save it on the iCloud. Now we will start to discuss the best Music library store app to download for free from iTunes.

List of best Music Library music stores in iTunes for free download:

You all have reached to the section from where you all can able to download the best music library music stores for free from iTunes. Let’s have a look on these applications mentioned below and if you want then download them easily from the iTunes store.

1. iCloud Music:

The iPhone, iPad, iPod users already know about the iCloud Music library app which comes inbuilt with the iOS devices. This is a very useful feature which you can get on iOS devices. It remains pre-installed with new iOS devices. When you will turn on this feature from the phone settings, then you can easily move your tracks into the iCloud Music storage. Even you can easily access those songs or tracks from other iOS devices, Mac, PC etc. Just you need to provide the same login credentials while accessing the iCloud Music app. Besides that, if you want to download any new music then directly you can search and get on your device through iCloud Music only.     

2. Sound Cloud-Music & Audio:

The next app which we are going to discuss here is Sound Cloud Music & Audio. From the name of this app, you can guess that it is a music library app which is available in the cross platform.  But here we will talk about the Sound Cloud which is free to download for iOS devices from iTunes. You can stream, browse and discover new music in various languages and save it through this app in the cloud for playing it in future anytime anywhere. On the basis of your likes and requirements, they will suggest or refer some of the best-related tracks as well. Create customised playlists and save your favorite songs according to your best moods.

3. Google Play Music:

Another best music library store for Android as well as for iOS devices is Google Play Music. This is a multi-functional app through which you can save, browse and listening music from local storage as well as through online. Even you can save your tracks to the cloud through the use of Google Play to fee up your device space. Up to 50,000 songs from your local storage you can able to save in the Google Play music cloud storage at no cost ever. The user can experience an Ad free un-interrupted experience while playing or listening music through this app on their iOS devices. Some other features which come with this app are offline listening, on demand access to more than 40 million songs, create own playlists etc. and much more.

4. Music loud:

Now here we will start to talk about a Musicloud app which is available for iOS 9.0 and later enabled devices. With an ease, you can able to download and install the Musicloud app on your iPhone, iPad or iPod directly from iTunes. Almost like the other apps, you can easily get the similar features from the Musicloud app as well. The best features which are provided by the Musicloud app is that listen and enjoy your favorite track in good sound quality, access the tracks through iPhone, iPod, iPad. Even you can save it in Google Drive, One drive, Drop box and access directly from that drive too. Easily you can download the Music Cloud App for free from iTunes store.

5. Sound Hound:

Sound Hound is an iOS application which works as a music store or library to holds a huge list of music tracks. This is a music player cum library to browse various songs from various sources. So if you want that you will keep your device free from music tracks, occupying space in your phone the Sound Hound is the best choice. Create your own playlist and choose your favorite tracks from a variety of tracks. Every track comes with specific lyrics and you can view it in this player easily. After discovering the new tracks, you can share them easily with the social networking sites like Facebook, twitter, email etc. and much more.

So these are not the end as there are many other music library music stores available in iTunes for iOS devices. The top five best music library apps we have discussed above for all the iOS users. Those who want to save their music tracks on cloud and keep their phone space free then these five apps are the best choice for you all. Go through the apps which we have discussed above download them from iTunes only. Choose any one of the apps and then download on your iOS devices. Even you can also use the dedicated iCloud Music service which comes inbuilt with iOS.      


read more
General

HD Themes for Windows 7

Every user needs some of the best HD themes for their Windows so that it can provide a best experience for the Windows user.  The Windows 7 is an Operating System from Microsoft Corp. which is needed to be installed for operates your computers. Users need to do some customisation in their computers when they became a regular user. So you need the HD themes for Window 7 desktop to perform the customization. There are various ways through which the user can change or apply new themes in their PC. Here we will discuss about the ways to create and apply the themes in your computer and also you can get some reference to download the themes from online. 

Let us discuss all those steps that how can you able to get variety of HD Themes for Windows and how make all those things useful for every user.

Different ways to get HD Themes for Windows 7

We will discuss every step for all the various ways to download and apply the HD themes in your computers as well as for laptops easily. So please have a look on the below ways to get your HD themes.

How apply in-built themes from your PC –

Do you know that you PC already come up with some of the pre-installed themes from Microsoft Windows Operating Systems? Yes, you can get some these themes in the personalization option from your PC control panel. Please follow the below steps to get and apply the pre-installed themes.

  • Start-up your computer or laptop and after that you will at first get the Desktop screen.
  • On that screen press right click on your mouse button and you will get on pop up menu option.
  • Choose the Personalization option and then the Personalization panel window will open.
  • On that window you can see some pre-installed themes for your Windows. The themes name may be remains like – Windows 7, Characters, Landscapes, Nature, Architectures, Scenes, United states etc. (sometimes the name may vary with the version of Windows OS)
  • Click any one of these themes any within few seconds that theme will apply in your desktop.

OR

  • Open the Control Panel by click on the Control Panel option from the Start menu.
  • Now select Appearance and personalisation and then choose Personalisation from that option.
  • That’s all and now as same the Personalization panel will open and do the same like above steps.

How to apply the in-built High contrast themes –

High contrast themes are specially provided by the Microsoft Windows team to provide an exceptional viewing feature for all the users. Like when you will apply any one of the high contrast theme in your PC the colour scheme will become changes and it can helps to save the power also with its dark interface. Steps to apply the high contrast themes for your PC will be discussed below.

  • Open your Personalization panel by following the above steps.
  • On that panel scroll on the below and you will get High Contrast Themes menu. One that menu you will get some High Contrast Themes in names like – High Contrast 1, High Contrast 2, High Contrast Black and High Contrast White.
  • Select any one of theme from the menu and the selected theme will be apply in your desktop and it will change all the colour schemes.

How to create your own Windows theme –

Rather than the pre-installed themes, you can also able to create your own themes from the personalization panel easily. To create your own themes please follow the below steps –

  • Open the Personalization panel and you will find some option on the below to create your own theme.
  • Now you will find 4 options to set Desktop background, Window colour, Sound and Screensaver.
  • Click on every option choose your best choice.
  • After that you customized theme will be create on the top of the panel named as Unsaved Theme.
  • Now you will get one save option on the right side of the panel and click here to rename and Save Theme.
  • Click on that new theme and it will get applied on your PC.

How to download HD Windows themes from Online –

HD Windows themes can be easily available from the online sites also. But we will specially recommend you to download the Windows themes from the official sites only. So that no third party theme which may contain viruses or bugs will not harm your system. We will tell you the steps that how you can able to download the themes from Microsoft Corp.

  • As described above to open the personalisation panel so do the same at first.
  • Now you will find one option on the top right side of the panel named as Get more themes online.
  • Click on that option and you will automatically redirect to the Microsoft Official site where you can get a huge variety of themes.
  • Various categories of themes you can get from that site. Select any one category-> Choose your theme -> Click in Download button.
  • Hence your downloading will start automatically.
  • After downloading the themes open that theme pack from Downloads and it will unzip automatically and saved in your Personalization panel.
  • Select the theme from the panel and it will get applied on your desktop.

N.B: Some steps may be slightly differing from the mentioned above depending on the version of windows but the basic all the thing will remain same.

So these are all the ways through which every user can able to apply various HD themes for Windows 7. Always try to use all the recommended official products for your system to keep your PC safe from harmful viruses. Try to follow all the above mentioned steps whenever you want to change the themes for your PC for the first time. Those who own the PC with Operating System Windows 8, 8.1 or 10 there will be some slightly difference found during changing the themes. So follow the on screen Windows guides if you find any issues.

read more
General

Guide for investing in crypto currency

As Crypto currency is a virtual crypto coin to hold or kept our money safely. Thus people are going to invest in crypto currency like Bitcoin, Ethereum, etc. This topic is all about the guide for investing on crypto currency. The main aim to invest money in currency is that we can gain some profit after a period of time on that amount of money. Sometimes the profit level may vary depending on the amount of money we are invested on crypto currency.

For example if you invested $3000 to $6000 at a time, then you will get a profit of $50 or something more at an interval of time generally. But it is takes long or the process is large to invest a huge amount of money at a time. Depending on that here we are going to provide a basic idea or guide for investing on crypto currency.    

Basic guide for investing on crypto currency:

So you all have reached to the correct place to get the guide for investing on crypto currency. One thing we want to clear out first that it is not valuable for the beginners if they are going to invest on crypto currency. The reason is that, they are not able to invest proper amount of money for getting the benefits. Thus you need to have a capability to invest a large amount of money at a single time to get the face of benefits.

Those who are habituated in investing in the crypto currency, they are most benefitted in this case. Some of the steps are written below which you need to follow before investing on crypto currency.

  • Initially, user or the investor needs to sign up for the Exchange which they want to do.
  • After that, you need to enable the two-factor authentication from both the sides to provide more security.
  • Then verify or accept that what you don’t know actually for investing such that you can get know about it clearly.
  • Choose the category if you are a long trader or a short trader to invest on crypto currency.
  • Try to understand the present condition of the crypto currency influence on the market.
  • If everything is ok then proceed to invest the amount on crypto currency. Please do not forget to pay the taxes.

Final Words:

That’s all about the basic guide for investing on crypto currency. You should always need to follow the above guides for investing the money on any digital currency. The whole process is covered under the program and cryptography only. Thus there will be no physical mode or operation is needed for investing process. Hope you all are satisfied with the information given here about the ideas which you need to apply before investing money on crypto currency.   

read more
General

Google Introduced “Posts Feature” in Google My Business

From now everyone can post news, feeds, events or any other things with the help of “Posts Feature” in Google My Business. Through this feature you can create a proper link or connection between the business brands and consumers. This feature helps to enhance and develop the business environment by publishing the needful things in the business world.  The Google My Business (GMB) will display all the posts in its dashboard which will create a most advanced business based knowledge sharing panel for all. User will be getting beneficial on the field of increasing their business promotion, strategies, rates sales etc. with Post feature. No need to get disappointed about this feature because this is a very simple thing which can make a very huge change in your business life.

Now you are thinking about the benefits of Post feature in GMB. Yes, you will get the whole information about the benefits which will surely get from the below described points. Read out the whole article to know more about the Post feature in Google My Business. We will also show you the path for creating new post in Google My Business and you can share it to others.

How can you create a new Post in Google My Business?

Now you are about to get the procedure to create a new post in GMB by following the simple procedures. So let’s have a look on the below points and perform the same.

  • First thing you need to know that you can access Google My Business from any Web browsers in Laptop, Smart Phones. You can also use Android App and iOS App to use it more freely anywhere in your Smart Phones.
  • Now open the Google My Business App or the site from web browser and Sign In using the Google ID.
  • On the left Dashboard menu you can find one option i.e. Posts and click here.
  • Write your text with short description and you should care about your word limitation i.e. 150 – 300 characters.
  • Upload images with high quality resolution photos i.e. 720X720 px in PNG or JPEG format.
  • Select your post type. (If it an event)

Image result for posts in google my business

Benefits of Posts feature in Google My Business.

Following are the best benefits which you can get while posting something through Google My Business. So check out all the features describe below.

  • It helps the branded business site or any company to circulate them in the digital world through this system.
  • Consumers can get the direct updates from your business sites about various offers, services, product launches etc. without visiting the websites.
  • It can handle the site traffics very efficiently and you can get the appropriate details about every brands and companies.
  • The existing consumers get the highest promotions and offers from the sites via this feature in GMB.
  • A top product of various brands kept in one showcase and highlights the new launched products.
  • Direct connect link with the customers from the Google listing to choose from an available option which they provides.
  • This is a total business panel which broadcast your brand and company in a huge range across the world.

Image result for posts in google my business

Do Business Brands use Google Posts?

Yes, it is true that many business brands use this Google Posts to connect with various consumers from the whole world. Some of the best restaurants use Google Posts to give the updates to various customers regularly. In some of the major cities various business teams and owners uses this Google posts to connect with the other partners and consumers to circulate their deals across the world. After few days regularly all type of business owner will start using this feature and circulate their deals with others.

So these are all about the Posts feature in Google My Business. Hope this article about the posts in GMB will definitely help you in the growth of your business structure. Get all the best updates by sign in on your GMB app and websites and keep connect with various business brands across from the world. If you consider that this feature is beneficial for you then please go through the Google.co.in/My Business and start using posts regularly. As you know that this is the time to create a Digital India so let’s put your hand together and grow up your business digitally.

read more
General

FRP Bypass APK

FRP- Factory Reset Protection is a high security feature provided by Google in Android smartphone. Using this FRP, we can easily secure our data even if the mobile phone gets lost. From Android 5.0 the FRP has been launched to keep our device secured. However, the main question is that what is FRP Bypass APK? Therefore, when we are going to reset our phone we generally forgot our login details from various user accounts. This is a very confusing moment that what we will do after forgetting the user credentials. In that time, FRP bypass tool will work to bypass that situation and you can log in again your device without using early credentials.

In this topic, we will talk about the procedure to download the FRP Bypass APK. Moreover, we will talk how to use it on your device completely?  FRP bypass is not available in Google play to download it. Thus we need to take the help of its Apk file to start work it in our phone. All the Android devices brands like Samsung, Micromax, LG, Nokia, Redmi, etc. support this Apk file to work on them easily. If some of you are facing the problem after resetting your devices then FRP bypass will surely help you in all needs.

What are the requirements to make use FRP Bypass Apk?   

If some of you know about the FRP application then it is ok. Nevertheless, those who have no idea they can check it out to get the proper details about it now.  Somme users get confused about that, if we have locked our device after resetting then how we will use FRP Bypass Apk in our phone. Thus we need to follow the below steps to resolve this issue completely.

Required tools:

1. Any USB pen drive or Flash Drive.

2. OTG-On the Go Cable.

3. Personal Computer or OTG supporting any device.

Using the above tools and devices, you can easily perform the task to bypass those user name and password from user account in your smartphone. From the nest point you will get know the working of FRP bypass tool.

How to use FRP Bypass tool in your Android phone? 

Hope you get an idea about the requirement tools and devices need to unlock your phone. Now let us have a look on the steps given below how to use FRP bypass Apk on any Android smartphone.

Step 1: At first, you need to download the FRP Bypass Apk on your device like PC/Laptop or any other USB supported device.

[Click here to download FRP Bypass APK free]

Step 2: Now connect your Pen drive to the device where you have downloaded the FRP Bypass Apk file from web. Transfer this file from the device to the pen drive and proceed to the next step.  

Step 3: After that, you need to turn on the device, which you have reset, and now it get FRP locked. In that particular device, you need to connect the OTG device through micro USB port. On the other side of the OTG i.e. on the USB port, you need to connect the pen drive.

Step 4:  When you will connect the OTG cable, it directly open the file manager of your phone and you can access it easily. Open the file manager and thus you can easily install the FRP bypass Apk in your phone.  While you will install this Apk in your phone, it may show you some warning that ‘file from unknown sources can’t be installed directly’.

Therefore, you need to open your Settings and the got to the Privacy and Security and tick the Unknown Sources option. Thus, you are able to install file from unknown sources too. After your installation has been completed successfully, you can open this app on your phone.

Step 5: Now you are automatically redirects to the phone Settings menu. Here you need to do the Factory reset of your phone to remove the early used Gmail account in your phone.

Step 6: Thus, you are now almost be done with the processes. The phone will now automatically get restart or you can restart your phone manually. After restart your device you can able to insert the new email id of your Google Account and set up your device freshly as like the first use.  

By following the above steps, you can easily insert new Google account after resetting your Android phone. This software is easily available in web and you need not to spent money for doing this job. However, if you are not able to applying the above steps then please contact to the expert to perform this job in your device.

How to unlock FRP in your phone, by downgrade the version of Android?

This is another method, which you can follow to unlock the FRP by downgrade your device’s Android version. For using this method, you need to have the custom rom of your device and other needful files with you. By installing the custom ROM of the lower Android version rather than the Android 5.0, you can unlock the FRP easily. However, this method is little bit tough compare to the previous one. As in, the methods you need to install the custom rom properly which do many users not know. You can check in web or other video in YouTube to getting the idea about to install custom rom in devices. 

Conclusion:

Finally, we want to tell you that these are all the two methods to unlock FRP lock in Android devices. According to our view, we will recommend you to use FRP Bypass Apk, which is quite safe and standard to unlock your device without altering your original OS. If you find this content is helpful for you then try the method once. When you were stuck to open your device by forgot the Google Account credentials, you can simply use this FRP bypass APK to unlock your device easily. You can also share this information with your friends to give awareness and help them as well.

read more
1 25 26 27 28 29 70
Page 27 of 70