close

debjit

General

How to Produce a Blog site on BlogSpot absolutely free?

Hello friends, today in this topic we are going to tell you to step by step process how to produce a blog site on BlogSpot absolutely free. At first, we want to inform you about BlogSpot blogs. So basically a blog is a website where you can get the latest updates on the topics related to the individual sites. On the other hand, to earn money online, then blogging is one of the best ways you can choose. Among the various blogging platforms, Blogspot.com is one of the best free blog services which is provided by Google.

In the field of the internet, the most used blogging platform is BlogSpot. Rather than BlogSpot blogs you can also find the other alternatives like Tumblr, WordPress, etc. are also available. But the BlogSpot is again very much popular and easy to handle blogging platform. Here in this topic, we are going to show you how to produce a Blog site on BlogSpot absolutely free. The step is not very much complex to perform. So you all need to follow our guidelines and perform the same which you create a blog site for the first time. Let’s have a look on the steps mentioned below.

Step by step guide- How to produce a blog site on BlogSpot absolutely free?    

You always need to keep patience as blogging needs sometimes to provide you the direction of profits. There are many bloggers available who had made this as a profession and currently, they are earning a large amount of money as well. Here we are going to discuss the step by step process to produce a site on BlogSpot blogs for free.

Step 1: Choose or decide your Blog topic-

The first step which you need to perform is to choose the topic for your blog to explore. You need to think that you are passionate about the selected topic. Moreover, the viewers have a huge crush on the selected topic or not. If you find that all the requirements are fulfilled and have positive feedback from your side, then proceed to the next step.

Step 2: Select the best Blog name-

The next or the second step which you need to perform is selecting the best blog name for your site. Keep in mind that the blog name should be unique such that the viewers can able to get reference about the site from the name. The structure of the blog site should be like this yourblogname.blogspot.com.  This is completely free to create and after that if you want custom domain then purchase it later. If your blog name is unique then it will not create any problem which purchasing the custom domain.

Step 3: Create blog site on BlogSpot blogs absolutely free-

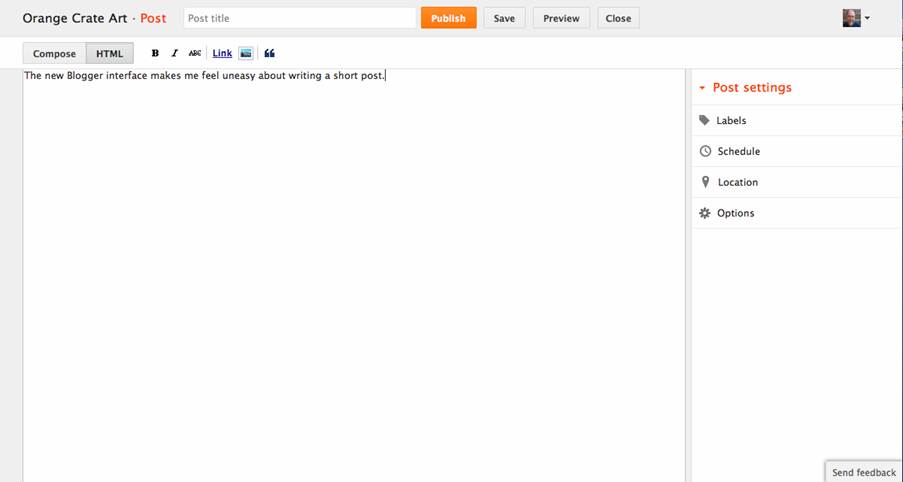
Now, this is one of the important steps from where you need to the process to create a free blog site. At first, go to www.blogspot.com and get the sign in using your Google Account’s username and password. Now Create New Blog by entering your blog title and URL according to your blog name. Like Blog title-My Blog and URL- myblogblogspot.com.  At last click on create blog button. Once you create the blog, the dashboard of BlogSpot will open where you need to select New Post. Enter the total details like Post title, article body, style, format, check the SEO, readability etc. before publishing it.  After that, publish your post on the BlogSpot site for free. Now view your post by entering the BlogSpot URL on the address bar of your Web Browser on PC or smartphones.

Step 4: Traffic driving on your Blog-

Another important step for the blogger to drive the maximum numbers of people as you can to see your blog. This can be done using some of the best techniques like Social Media- Facebook, Twitter; Search Engine Optimisation-Google, Bing, MSN, Yahoo etc.

Now you need to take care of the Blog site reputation. For ranking your site on the top of the Google search then your topic should be remain trending. Like according to the current trends your topic should have a crush to view by a large number of users. Once if you drive the highest number of traffic on your site then your page will automatically become reputation and get ranked on the Google search at first.

Step 5: Blog Monetizing-

You always need to keep up to date your sites will all the new updates available for your topic. Put advertising on the third party sites or from the ad publishers and you will get paid accordingly. You can even add the ad publisher program on your site to get the proper ads.

So these are all about the process how to produce a blog site on BlogSpot absolutely free. If you are a beginner blogger and want to create a best BlogSpot blog site then definitely go through our above-described steps for the proper guidelines. Hope you all are satisfied with the information which we have provided here about to create a BlogSpot site for free. At least try these for once such that you can also able to become a professional blogger accordingly in future.    

read more
General

How to play music without Wi-Fi?

Many smartphone users are there who really fond of music. As music is one of the best ways to release your stress and even feels you good in boring time. Depending on that we all generally use the online music streaming apps to download and listens to music. But do you know that there are many apps available to play music on a smartphone without Wi-Fi or mobile data? So do not get worried as here we will show you how to play music without Wi-Fi or data. The main thing is that user needs to use some of the specific offline music streaming apps on their phone to get this facility.

There are generally many apps available to download for free to play music without internet. Here we will provide you the name of those applications which will help you to play music offline. Besides the name of these apps, we will provide you the proper links to download those apps on your phone directly. So let’s discuss the basic information of those apps to play music without Wi-Fi.

Best Apps- How to play music without Wi-Fi:-

Now you have reached to the correct place which will help you to know about the apps to play music without Wi-Fi or mobile data. Follow the below discussed context and choose your best-needed app to play music offline.

·      Pandora:-

Pandora music is a very well-known and popular app for the smartphone user.  This music streaming cum playing app is available for both the Android and iOS devices. So those users who having iOS or the Android smartphones can easily able to download this app directly from their app store. The free version of this app contains ads but the premium version does not contain any ads to display. Save your favorite tracks to this app and play it in offline mode also.

·      SoundCloud:-

SoundCloud is an online application for streaming music in Android tab, smartphones as well on iOS devices. This application is totally free to stream and listening the wide variety of fresh music in various languages. This is one of the world’s largest music and audio streaming app at all. For all the listeners and creators, this app always provides a feature of offline playing tracks through this application only.

·      Spotify Music:-

Presently, Spotify is a free music streaming app for Android smartphones as well as for tabs. You can able to listen to the right track according to your need like your mood and place. You can also create your own custom music and discover the new music which is instantly getting updated every day in this app from across the world. Download and play the music on this app for offline use.

·      Groove:-

Another offline music playing app is Groove. The user can use this application on Android as well as on the iOS devices too. Search your favorite track from a collection of millions of variety and save the track for the offline use. Thus without the presence of internet, you can play the saved track through the Groove music only.

·      Musify:-

Musify is also helping you to play music without Wi-Fi or data connection. But this app is only available for the iOS only. But you can get all the similar features like the above-discussed app from the Musify also. So once download this app on your phone and listen to the offline music playing feature on your iOS devices.

That’s all about the apps- how to play music without Wi-Fi or data connections. If you will download any one of the above-needed apps on your phone then you can definitely play the music on the offline mode also. These apps are totally free to download from the above-given links, so feel free to safely download the apps from those links. Hope you all are satisfied with the information which we have provided here about offline music playing app for Android and iOS.

read more
General

How to increase internal storage of smartphone?

Most of the time it has been found that our internal memory goes out of space. This is a common problem happens with most of the smartphone user after few days. Sometimes some of you manage your files to the external storage and make the internal storage free. However, some users are there who don’t have idea about the process to free up or increase the internal storage of smartphone. Thus, here in this topic we will talk about how to increase internal storage if smartphone very easily.

Almost all smartphone has provided the feature to use external memory card for increasing the phone space. Nevertheless, it is only to extend the external memory space. If you want to increase the internal storage then you need to follow the below steps which are given here only to maintain or increase the phone storage regularly.

Proper Guide – How to increase internal storage of smartphones?

Now you have reached the proper section that gives you the proper guide to increase the internal storage of smartphone. Let us have a look on the steps given under every method and apply the same to increase the phone storage.

Method 1: Use the app, GOM Saver:

With the help of GOM Saver, you can easily compress the large files like audios, videos, and images in an ease. This Android app is available on Google Play to download and install free. 

  • At first, search the app in Google Play and click to install it on your phone.
  • Now open the app GOM Saver from the launcher icon and do not make any changes in its default settings.
  • After that, the app will start to compress the images and videos and you can see that how much memory you are saving through it.
  • You can choose the option to delete or back up the original files.
  • Now the compress file will save in your phone memory. After compressing, you can clear about 50% of the space easily. Like if you have early occupied 10GB in your phone memory now it will occupy only 5GB.
  • Thus, you have successfully increase the internal storage.

Method 2: Move data to External SD card. (Use recovery mode)

The next process to increase the internal storage of your phone is to move the internal memory file into external SD card via recovery mode.

  • Go to the Google Play and download the Link2SD app. After that, the app will install on your device automatically.
  • Now turn off your phone and go to the recovery mode using Volume keys + power/Home button. As in recovery, mode touch does not work so you need to navigate using those volume, power and home button.
  • Now tap on the Link3SD app that is located in your app drawer.
  • From the drop-down list, choose the Advanced option.
  • Choose the Partition SD Card from the advanced menu option.
  • Tap on ext size (size need to smaller than your memory card size). Then tap on swap size (size should be zero)
  • Now, wait for moments.
  • Choose “+++go++” option.
  • Select reboot option and start the phone.
  • Open the Link2SD app.
  • Click on Allow to give the permissions.
  • Choose Ext2, which will appear in a pop-up.
  • Select the OK option to restart your phone.
  • Again, tap on the Link2SD app and choose ‘Filter’ icon from the top of the screen.
  • Tap “On Internal” option.
  • Tap “option” icon.
  • Tap on “Multi-select-> “Option” icon -> “Create link” option -> “Link application file”-> “Link dalvik cache file”->“Link library files”.
  • Tap “Ok” and wait for few moments -> “Ok”.
  • Now you have successfully moved the internal storage file to SD card and your phone memory is now increased.

Method 3: Remove or Delete Apps Cache Data:

It is very much important to keep your phone memory free by delete or remove the cache data files. To remove the cache files, you need to follow the below steps.

  • At first tap on the Settings icon of your phone and go to the next step.
  • Scroll down and choose the Storage option.
  • You will now find the Cached Data and tap OK to clear all the cached data successfully.

Method 4: Move Photos and Videos to Google Drive:

This is a common process which may all of you know about it clearly. Still, if anybody has, any confusion then follows the steps to back up your photos and videos to Google drive to save your phone space.   

  • Open the Google Photos app from your phone and tap on the menu.
  • Now tap on the Settings tab and go to the next step.
  • Tap on Backup and Sync and choose the photos and videos, which you want, to backup now.
  • Now wait for the time to back up process is completed. You can also delete or trash the items, which you do not need further.

Final Words:

Finally, we want to tell you that if you keep your phone internal memory more free then it helps your phone to run faster than ever. So always, try to follow the above methods to clear the unnecessary files and keep your needful files in your SD card. Hope the topic about how to increase internal storage of smartphones is now clear to all. If you need the same then feel free to apply the methods in your phone to increase your phone memory as always you want.

read more
General

How to download stories on WhatsApp?

A new gift for the WhatsApp users is ‘WhatsApp Status’ which get introduced in its 8th birthday. The status or stories of WhatsApp are almost like the stories of Snapchat.  Thus by replacing the boring text status of WhatsApp, you can able to put the photos and video stories as well. This feature helps the WhatsApp users to download stories from WhatsApp in an ease. Here in this topic, we are going to tell you ‘How to download stories on WhatsApp’ properly.

When someone has uploaded the stories then it will remain to show in status for 24 hours. After that, it will automatically delete from the status menu. By default, there is no way to download your friends and family status directly in your phone gallery. However, you can able to make this thing possible with the help of “Story Saver for WhatsApp”. This app is easily available in Google Play to download free and install on your phone. In every way, this app is very much useful to download WhatsApp stories in your phone.

How to download stories on WhatsApp using “Story Saver for WhatsApp?” 

As we already inform you all that normally in WhatsApp there is no way to download anyone’s stories. But, using the application ‘Story Saver for WhatsApp’ help you all to save the story videos and pictures easily in your phone’s gallery.

Let us have a look how to download and install ‘Story Saver for WhatsApp’ to save the picture and video stories on WhatsApp.

  • The first step that you need to follow is downloading the “Story Saver for WhatsApp” from Google Play. For that, you need to open the Google Play Store from your Android mobile and type the keyword ‘Story Saver for WhatsApp’ in the search box. The preferred app will be displayed and you need to click on ‘Install’ button to start downloading. Now, wait for the app to complete the download and installing process on your phone.
  • After successfully installing this app on your phone, now follow the next step to go forward. Please try to maintain the total sequence while doing the same operation on your phone through this app for downloading the stories.
  • Now open the installed application by click on the launcher icon created in your app drawer or home screen.
  • When you will open the app, it will ask you to grant the permissions to access your WhatsApp data through this app. So, your work is to grant the permission to access all the data from your WhatsApp app by the Story Saver for WhatsApp. Now the new app will grab all the stories data from your WhatsApp and start to display on its own screen. 
  • Then the main dashboard of the app will display on your screen where you can find the tabs to do the operation.
  • If you want to download the Image stories then click on ‘New Images’ then choose the preferred image and click on the download icon to save the Image. In the same way, if you want to download the Video stories then click on ‘New Videos’ then choose the preferred video and click on the download icon to save the Video in your phone gallery.  
  • You can also view the downloaded images and videos instantly from the app by click on the ‘Image’ and ’Video’ button. In this way, you can able to download the stories in your gallery successfully without any problems.

This is one of the best WhatsApp story savers, which you can use if you want to save any of your friends or family member’s stories on your phone. You can get many other features like to download all stories from a single contact, view recent stories, forward or repost the same status and much more. Besides that, there are many other apps available in Google Play for free to use for the same purpose. Some of those apps are Status Saver for WhatsApp, Status Downloader, and Status Downloader for WhatsApp, etc. 

Final Words:

At last, we want to tell you that ‘Story Saver for WhatsApp’ is a useful app to download WhatsApp stories. But, this app comes with ads which may make you annoying sometimes while using it for your need. Rather than that there is no other problem arises from this app on your phone. Hope you all are satisfied with the information given her about How to download Stories on WhatsApp. Many of you are not familiar with this procedure but now you can use this app to download stories at any time in and ease. This app is too much light and it does not occupy much space on your phone after installing. You just need to keep free space for saving the image and video files of the storied which you have downloaded through this app.

read more
General

How To Compare Insurance?

Hello, friends get ready to learn how to compare Insurance for getting the best value. Basically, Insurance is done to protect our life and assets from the unexpected cause.  There are many companies available who basically provides the services to compare the Insurance policies. Insurance mainly covers the items like lift, car, health, house, pension, business, travel, etc. But in this topic, we will discuss in general process to get the best profit and save your money in doing the Insurance policy.

Do you know how to choose the best company Insurance for you? There are many factors basically involved which you must need to take care of choosing the best Insurance Company.  The price value is the top factor but rather than that many aspects are there to consider. Check the best policy term from various companies; compare the coverage, strength, weakness etc. Before placing your money with Insurance companies, check the financial background and the health of the company. Without taking more time let us talk about how to compare Insurance to get the best policy.

How to compare Insurance? Know the Rating first:

The category of ratings is declared by the IRDA for every valid and trustable company. Thus every company carries their own ratings. The rating may change according to the Companies level.  This is one of the important factors to check during compare Insurance Company.

Here we have listed out the rating list starting from a level high to low. So have a look at that rating list.

AAA stands for Extremely Strong

AA stands for Very Strong

A stands for Strong

BBB stands for Good

BB stands for Marginal

B stands for Weak

CCC stands for Very Weak

CC stands for Extremely Weak

R stands for Under Regulatory Supervision

NR stands for Not Rated

Check for the Insurance Coverage:

The next step is to check for the amount of coverage they declare for your items. Suppose you having four wheelers and it faces one critical accident. As a result, the interior and exterior of the car both get damaged and the passengers also get injured. Now check which company will provide you the more damage and injury coverage under Insurance. The company which will give you the more coverage is to be selected as your best company. In this way, you need to choose the value in other segments also.

Check out the Term of Policy:

Now the thing which you need to check the term or period of time for which the policy will exist. Sometimes for some items, the term of policy may fluctuate. But generally, the term remains same almost same for all. The company which randomly changes their term of policy do not go for that. Choose the stable and more beneficial companies to make the Insurance policy. Verify the term of the policy and compare it with others to choose the best one.

Make your own scoreboard:

You can make your scoreboard depending on various items. You need to give the score not only by thinking the companies present but also the future too. Present and future, both the performance of the company are important for all. The items on which your scoreboard will depend are:

  1. Price: At first check the value of money which you will get from the company after claiming the insurance.
  2. Response time: Check whether you are getting the fast response from the company or not.
  3. Friendliness:  You Insurance Company agent is friendly or not? If he/she is annoying or grumpy then skip those company simply.
  4. Knowledgeable: Does the Company agent has a capability to explain the whole policy terms or not?

Depending on these factors you need to generate your own scoreboard and compare the Insurance Company.  

Final Words:

So these are all about the procedure that how to compare Insurance company to grab the good values. Basically, the above factors are implemented on all the types of Insurance Policy to compare the company value. Hope your doubt about to choose the Insurance Company is now almost cleared. If you need the in-depth detail then choose the Insurance Company comparing sites to know more about it. At last, we want to tell you that choose the best Insurance Company to make your policy now.   

read more
General

How will the cryptocurrency market recover?

Some of you may think that how the cryptocurrency market is moving now a day. It is given that there are some temporary flash crashes about the present condition of cryptocurrency market. Until now at approx. 137 million dollars, the Bitcoin is the largest cryptocurrency in the present market. It is also considered as the leading cryptocurrency in the present market.  Suddenly the Bitcoin has faced the big drops in the market which other coins follow. However, do you know the actual reason behind the price drop of cryptocurrency? Well, there are some of the numerous reasons present, for which this happens with digital currency in the market. It seems that, from the last year, Bitcoin has raised and faces the tremendous growth or so.

Those who are the early investors or dealing with Bitcoin, they will still get lots of profit in the digital currency room. Currently, peoples are getting fear to invest their money in Bitcoin. However, do you know why the digital currency goes so dangerous? Therefore, we need to wait for sometimes until the technologies of cryptocurrencies will rectify to kick out these problems. Like the Lightning network of Bitcoin and Proof of Stake on Ethereum is need to recover for maintaining all these things in a proper way.

Billions of the money have been raised using the Bitcoin. Thus, it is very important to protect these cryptocurrencies in a good way. While there is a big fall in the share market, the money from digital currencies helped those markets to stay safe during that period. According to the Storonsky, the price of the currencies is not the actual way to judge the health of Digital Market. Perhaps these dropping are normal for the digital market to happen with them. Mostly it is important to keep them safe by maintaining the technologies uses by them.

read more
General

Fake mail generator sites

Fake mail generating is important now a day to log in to unwanted sites. It helps us to keep safe from the spam emails and other unwanted emails to get enter in our master email ID. Suppose you need to register in some sites, which are not genuine and trustable according to you. In that case, you can simply insert the temporary created IDs and use it for single time on them. Such that user’s primary or personal email IDs will get safe from those un-worthy sites and from other risky sites too. However, for creating those fake email or disposable email IDs, you need to take the help from Fake mail generator sites.

If anyone of you reader has already aware of those sites to create fake IDs then it is fine.  Otherwise, you can surely go through our content, which is going to discuss below to get the overall sites names and detail to creating your fake email IDs. One thing we want to tell you that the fake mail generator sites are completely free to create your mail IDs in a quantity you want. There are no such bindings; they will provide you to create fake or temporary mail IDs. So get ready to create up your fake email IDs using the below fake mail generator sites.

List and details of best fake mail generator sites to create temporary email IDs:

May you all are eager to know about the best fake mail generator sites from the content below. Readout carefully about each sites before using them for your need. Every site has their own specific feature, which you will get while you use them to create your own email IDs for temporary basis. We will not take more time from your and let us start to know about the details of best fake mail generator sites.

1. Discard.Email:At first, we will talk about Discard.Email, which is a very useful fake mail generator sites for all. Those users who want to create multiple domain email IDs using a single site then this is the best option for you. This site has a capability to serve you 20 different email IDs using separate 20 mail domains. Therefore, we think this is a good feature provided by this site, who wants to create multiple fake email IDs. Like the general email account, this site also provides you to create the specific passwords against every user IDs. So make your account safe as like the real email account IDs. However, the time duration for the fake email IDs are totally temporary and for limited time period. There you will get preferred icon to choose separate domains to generate multiple email accounts. To avoid those spams create the fake email IDs using that website and use them for temporary basis in multiple sites. In this email IDs, you can also get inbox and reply to your incoming emails as like the general one. These fake IDs will work as the genuine one but they will surely help you to keep your original ID confidential from log in into unwanted sites.    

2. Inbound.Plus:Another fake email generator site is Inbound.plus, which is also use for fulfilling the same purpose at all. Using this site, user can able to create email IDs with the @inbound.plus free domain. You need not to register in this site to create up your email IDs. Moreover, this site offers you to create random email address without following compulsory rules. Before creating the email ID, you need to input the personal details in a random way you want. Just you need to fill up the required field to complete the whole process. If you want to log in or register into unwanted sites, which are not trusted according to you, in that case insert the fake email IDs to complete every steps. As a result, the spam emails, which will get auto-generated from those unwanted sites will not disturb your original mail ID and the fake ID will receive those emails. After some time that mail ID will be automatically deleted or you can manually delete it if you do not want it for your need. In this want, Inbound.plus will help you to create fake email IDs using their domain and use it as a disposable email account with ID and password for a single time.    

3. Fake inbox:From the name of the site title, it is clear that you can create fake Email account using the fake inbox site. This site helps you to generate the random email IDs automatically or you can add manual ID, as you need. You can also set up the time limit of the ID that for how time you need to work with that ID. Like, you can fix the time limit from one hour to more for working with that ID. After that in the bottom of the page, you will see the time remain for closing that temporary based email ID using the on-screen timer. If any user want to re-use that ID then they can do easily restore to use that again easily. Otherwise, delete that email ID permanently from the web. The fake inbox website will provide you the best interface to reply the emails and you can view the emails completely like the general ones.  One negative thing in this site is that there are unwanted ads will pop up or open in your screen while using this site. However, rest to it every things are quite good and simple to use the every features free.

4. Yopmail.com:Yopmail.com is a very beautiful name or domain to create up the free and temporary email IDs by anyone. Some of the best features provided by this site are that there is no headache to remember the password and no need to register as well. So in some easy steps you can able to create up your free disposable IDs by your own. Just you need to insert one unique email ID that is comfortable to you and thus you are done. After creating the ID there you will get auto-generated Inbox and you can easily replay to the received emails too. Without any hassle, you can use the created email ID and thus your main personal ID will get safe from the unknown and untrusted sites as well. Like the genuine email domains, you not get too much features or functions in this Yopmail.com.  This domain or ID related to it is totally for temporary basis and thus the inbox will get deleted after a limited period of time as well. After creating the email ID, you will receive incoming mail notification for your instance. In the list of fake mail generator site, this yopmail.com is the best and recommends one for you all.

5. 10 Minute mail:Another interesting, fake and temporary email-creating website is 10-minute mail. Users who do not want to show or provide your original email ID with the unknown sites then create the fake ID using the 10-minute mail site. In a few seconds, you can able to create up a new mail randomly and use it accordingly in different sites for completing you need. The validity of the single email ID will remain for the 10 minutes only. If afterward, you want any other email ID, then create another one and use it for next 10 minutes. We think the 10-minute time is more than sufficient to log in to a website using the fake email ID. Operating this website is very much easy as there is no need to input any detail for creating the email ID. Moreover, this site does not require any registration process and even there is no need to remember any passcode as well. Simply visit the website and thus the site will automatically generate one email ID for you. Copy that email ID and use wherever you want within 10 minutes. The countdown will start after the ID will get generated and it will be valid for 10 minutes.   

6. MintEmail.com:The name of the fake mail generator site, MintEmail.com is very much attractive to all. Like the name of the site, you will get many good options and features to create up the disposable mail IDs. Without wasting your time, you can simply create up the mail ID for temporary use. Then go to the site and insert the fake email ID to avoid the spams and other disturbance. It offers you create free email at anytime from anywhere. Some of the websites need the email verification to proceed. However, in such situation we are not getting ready to provide our original email IDs. Therefore, user can instantly visit the MaintEmail.com site and create the disposable mail automatically. Like the original email IDs, you can able to get the notifications of incoming mail, view the mail body after arriving in your ID. The inbox will get automatically update and it will notify you in receiving up the new mail. So almost, you can receive all the features using this fake mail-generating site. As like the other fake email-generating site, this MintEmail.com also helps you to create multiple email IDs according to your need. You can definitely go through this site to create up the new fake email ID.    

7. Mail Expire.com:Easy and simple fake mail generating site is MailExpire.com. This is a total custom process to create up the fake email IDs. There is no need to insert any personal original detail in the web for completing you need. Just create the free email address and enter the minimum or maximum lifespan for that you want to use the email ID. Maximum you can use this ID for lifetime. Thus, when you need to give any email ID for verification in no trusted websites, you can definitely use MailExpire.com based domain IDs for satisfying that need. In the other hand, you can say that the mail expire.com is more safe and easy to use for the beginner and advance user as well. So forever, you can use a single fake ID to avoid the unwanted emails in your original accounts. Rather than that like the general mail ID you can able to send mail and reply the receive emails from your friends and other sources. In case you are going for shopping and you need one email ID for verification, then also you can use it for the same purpose as well. So once, choose this site and see what it will offer to you all.

8. Airmail:Airmail is a hubwhere you can easily create the fake email IDs with the help of another third party fake email generator sites. Up to some limit, you can get the same comfort in the fake Email like the normal genuine IDs we have used in general. The user can generally use this site in their Apple devices to auto-generate the fake or temporary based email IDs. While you are visiting the untrustable non-wanted websites and need to register or verify your email, then use the free fake emails created with the help of Airmail. There is no need to get register or sign in for creating the email in Airmail hub. The location of the email ID is considerable and you can check the emails using the other devices by inputting the private URLs. One mail you will receive the fake ID will be kept for a day i.e. for 24 hours only and then it will automatically be deleted from there. If you want to see a message for multiple times then also you can watch it or view it within the limited period only. The main reason behind auto delete facility is that the sender will never trace your IP address and this is a big security for you all. Therefore, this airmail is best and comfortable to use by the Apple users.

9. Mailinator.com:   For generating or creating the fake email ids in expendable location, then Mailinator.com is there for you all. Without having a fear of spam emails you can definitely visit any websites by use this fake email ids. They can able to help you to access any websites by hiding your original identification. After creating the mail ID using the Mailinator.com site, the mails will get automatically transfer into your trash folder. Now you can check that mail whenever you will need it like on the daily, weekly or monthly basis. If you will not able to input the email ID for creating from your own then the site will automatically provide you the suggestion in that case to you.  It is not compulsory to enter the email according to your personal detail. So input any random ID and for any help you can choose the suggestion link too. This site is completely free to use and helps you to keep avoid from the spams and other annoying auto-generated emails to come in your inbox.  Create multiple mail IDs to use for different sites. On the other hand, you can use a single ID to the various sites as well. 

10. GuerrillaMail.com:Among the PC users, the GuerillaMail.com site is one of the popular sites at all until now. From now, you can keep your inbox safe from the unwanted spam emails by using the fake email created by guerillamail.com. This website is very much easy to use as it will create the fake email for you in some simple steps only. The mail, which will received in the inbox of this GuerrillaMail.com domain mail, will get automatically deleted after an hour only. It will not bother for you that whether the mail is read out or not. To keep your main or primary email ID i.e. original safe, these fake ID will be used in verification of any websites. As this site is popular and frequently used by all, so you can also try this site in alternate to the other fake mail generator site as well. Rather than that, this website does not require any type of registration, personal details and it is completely free to create any email ID when you want. From today, you try to keep safe your original account from the spams and provide the fake email ID in the non-trustable verification of the websites.   

11. Dispostable:Now we will talk about dispostable which is also considering as the fake email creator domain in all sense. Just you need to choose and pick up the random email id to create the fake email to complete your need. This site also offers you the site recommended email IDs if you are facing problem in creating ids on your own. Moreover, on this site, you will get auto delete mode for the incoming emails after a certain period. The fake email, which you have created, is completely free to use on any sites for email verification. Thus, it will help you to keep your original ID completely safe from spams and unwanted messages.  There is even no limit in creating email IDs using the dispostable.com domain. You can also reply the incoming emails with the auto-generated reply main already contained in the website. Besides the other websites, you can also choose this site to create the fake emails.

12. TempMail: TempMail is also known as temporary mail, which offers you to create the temporary emails as like others. This TempMail website is completely free and secure to use by any users. As same like the other sites, you will get the features of inbox and auto delete of incoming emails too. Thus you can abundantly use this free disposable email in any part of email verification by any websites. Use this mail in temporary basis such that you need not to provide your original mail ID everywhere. As a  result, the privacy will be remain against your primary mail ID as well. There are many strangers’ sites available in web that generally trace our mail ID and start to send spams and other unwanted ads in general. Therefore, these types of things will flood our mail Inbox every time. And it become very much annoying to users at all. If you are thinking about your privacy then do not share your email IDs to the unknown personnel.        

13. Nada:Nada is a fake email-generating website that is mainly offers your temporary email service and safe email browsing. At first, you need to register in this website account site free. Then enjoy unlimited email ID creation for temporary basis. Create the disposable email IDs in the Nada and get the features of it in all websites. Therefore, start the email verification in unknown sites using the fake email and keep your original mail ID safe from being spams. Here you will also get the Inbox which is remain validate for the seven days only. After that, the message will get auto-delete from the account without any further notice. To using this website is very much safe and secure too. Thus the strangers will not able to trace our IP address while using those fake email IDs. Even those IDs will work out as fine like the original and genuine email ID only. 

Conclusion:

Finally, we want to tell you that these are all about the topic fake mail generator sites for every user. Hope you all are satisfied with the content, which we have already posted on the topic here. One thing we want to tell you all that besides the above-listed websites, there are many other sites available on the web to work free. You can go through them too. However, these above websites will create the fake email IDs, which is definitely working on every site, where you do not want to expose your original personal email, ID. That is all about this topic and if you find it helpful then tries to share it with your friends and family members too.  

read more
General

Download And Install KIK For Windows PC

Most of the smartphone users know that KIK is a best messenger for messaging and chatting. This app is available to install for iOS and Android phones. However, here we will talk about to use the same app in Windows PC. Officially, this app is not available to download in PC version. No need to worry as there is a bypass way, which will help you a lot to download and Install KIK for Windows PC. Those users who do not have Android or iOS devices with them, they can easily use the KIK messenger through their PC only.  The primary way to use KIK messenger in Windows is via Blue Stacks Android emulator app. This emulator helps you to run any Android app very easily without any further need.

Kik messenger was first introduced in 2009 with the inventions of students from University of Waterloo. This app comes under the social networking app to be use easily in Android and iOS smartphone. It also listed among the best and cool messenger app until now. Besides chatting, user can able to share files like images, music, videos and more through this app. In this topic we are going to talk about the methods to download and install KIK for Windows PC. Along with it, the features of Kik messenger will also get discuss in this topic only. Without taking more time let us have a look on the information which are given below.    

Step by step guidelines – How to download and install KIK for Windows PC?   

As we already inform you that for running Kik messenger in Windows PC it is necessary to have an Android Emulator in your PC. There are many emulators present in the web to download for PC. However, we strongly recommend the Blue Stacks emulator as it is very much popular and secured to use for any users. So let us have a look on the procedure to download and install Kik Messenger for Windows.

  • At first, you need to keep your PC ready with Windows Operating System version 7 or later. Moreover, make sure that your PC having Intel core2 Duo processors with 2GB RAM for install thing that app easily. If you have met with these requirements, then connect your PC with good internet connection and open your web browser. Type in the URL and search for download the Blue Stacks application on Windows PC. Once you have the search result, click on the official site of Blue Stacks to download it on your PC. Wait for the browser to completed the download process, and thus the file will be saved in your PC.
  • After completing the download process open the file from the download folder or the location where you have saved this file. Double click on the Blue Stacks installation file and it will start the installation wizard there. Now follow up the on screen information to complete the installation of Blue Stacks in your PC. When the installation process is completed, you need to run or launch this app on your PC. After launching the Blue Stacks app, you need to sign in on the app using your Google ID to complete it set up process, which is mandatory.
  • Hope you have installed the Blue Stacks in your PC successfully. Now again open the web browser and again search for the Kik Messenger Apk to download in your PC. If you downloaded the Apk in your phone then transfer it on your PC. Otherwise, wait for the file to get download through browser in your PC. Once the download has been completed, now it is the time to install on your PC.
  • Open the Kik messenger Apk file, right click on it, and choose open with Blue Stacks emulator. The Kik messenger will start to install in the Blue Stacks app automatically. After installation has been completed, the app will create one shortcut in the home screen of the Blue Stacks emulator. From that shortcut, you can launch the messenger and follow the on screen information to set up your messenger.
  • Once the set-up has been completed, now it is ready to start chat with your contacts who currently using the Kik messenger. So you are now ready to start use your Kik Messenger for PC. 

Features of Kik Messenger for Windows PC:

Before using the Kik messenger in your Windows system, it is required to know about the features of this app completely. So, have a look on the below points to know the features of Kik Messenger for PC.

  1. This app is very much safe and secured to keep connect with your friends and family members.
  2. You can easily share files with other contacts in subordinate to chanting and messaging.
  3. It comes with in-built browser where you can share URL during chat.
  4. The user interface of this app is very much friendly and simple to use.
  5. There is no cost to use this app and you need not to spend a single penny in it.
  6. You need not to use mobile number to register for using this app.
  7. In comparison to other messaging app, the performance of Kik messenger is very well. 
  8. You can use this app on iOS related devices, Android phones, and now in Windows PC using blue stacks emulator.

Frequently Asked Questions:

Q: What is KIK?

A: Kik is a messenger, which is basically used to chat with friends, colleagues, family members and others. Around you, it helps to connect every peoples with each other through this app.

Q: What is Blue Stacks?

A: Blue Stacks is an Android Emulator to run Android applications in Windows PC. You need to unstall it on your PC at first to run the Kik Messenger in PC.

Q: Does Kik Messenger support by default in Windows PC?         

A: No, by default Kik messenger is not available for Windows. You need to use the Android emulator with Kik Messenger Apk for run in on Windows PC.

Q: Which devices do Kik Supports?

A: Kik Messenger is supported by default in Android, iOS and Windows Phones.

Q: Which version of Windows OS in PC needed to install Kik via Blue Stacks?

A: You can use Windows 7 or later OS to run the Kik Messenger easily in your PC.

Q: How much is the cost to use Kik Messenger?

A: Until now, the Kick Messenger is completely free to download, install and use in your devices.

Conclusion:

That is all about the information to download and install KIK for Windows PC. Hope you all are satisfied with the information given here about Kik messenger for PC. Besides the download and installation steps we also listed out the features of Kik Messenger with FAQs also. So all the basic information about this app is listed out there for satisfying your need. If you also want to run this app on your PC then follow up the above steps and apply the same now.  You can also share this information with your friends if they need the same app to use in their Windows PC. Feel free and download this app on your system to experience it more at all. 

read more
General

Create Gmail.com Account, Gmail Login steps, Information etc.

Gmail is also known as Google Mail which is a universal device supported mail sending and receiving site from across the world. This is one of the most prominent mailing sites from across the world. Beside Gmail you can also get Yahoo mail, Outlook etc. Presently everybody needs one mail account for official and non-official purposes too. So creating Gmail Account is not so much tough for the users. If you create one Gmail account then you can access many online products like Google Play, Drive, Maps, Facebook, Instagram, Online shopping, bank account, Chrome browser, Chrome OS, Mobile wallet, Android Phones etc. All the Google products can be used by providing a single Gmail ID only.

For using these features you need to know and follow some steps to Create Gmail.com account, Gmail login steps, Information etc. Provide some of your personal information for the first time during the time of create one Gmail Account. But keep in mind that your Personal Information will not share by the server to the others or publically. So, follow the below guidelines which are provided below to feel you convenient while creating and using the Gmail Account.

How to create Gmail.com Account?

These are the step by step procedure to create the Gmail Account for your personal, official or non-official use. Initially your device should get connect with proper internet connection and keep one mobile phone with you which have SMS receiving facility.

  • Open your installed web browser like Google Chrome, Mozilla Firefox, UC browser etc. and type the key word accounts.google.com/Signup on the top search bar and hit the Enter button or click to search on your browser.
  • Wait till the Sign up page will get open and displayed on your screen. On the right side if the page will see one form to insert your information details. So fill up the whole form by inserting your First name, Last name, User name, Birthday, Gender, Mobile number etc.
  • Keep in mind that you need to provide an existing email id during creating the Gmail account. You can use your other emails, or your friend email or any email id available you have from other domain also.
  • After providing the information you have to click on Next step button to proceed further.
  • Now you will get one page where you need to accept or agree or tick the user Licence and Agreement and then you will redirect to the verification page.
  • The verification page will ask you to select the option whether you want the One Time Password (OTP) via text message or phone calls on the mobile no. which you already provided. After select the option you need to wait till you receive the SMS or phone call.
  • Insert the received OTP on the verification page and click Ok to verify.
  • Once the verification has been completed successfully you will get redirect to the Gmail home page directly.   

How to Login into Gmail Account?

Now you are ready to Login in to the Gmail Account. For start login you need to keep ready with your username and password.

  • Open any browser and type Gmail.com or open dedicated Gmail App form your devices and you will get the Gmail log in page displayed on your screen.
  • Enter the Username and Password and click Sign in.
  • Now you have reached on the homepage of Gmail Account.
  • Now visit the Gmail Settings page by click on the icon present on the top right corner of the page.
  • Apply your Profile Picture, Change themes etc. and prepare your Account completely.
  • Compose, send and receive message from your friends and colleagues through this account easily.
  • If you want to Log out then click on the account picture on the top right corner of Gmail Dashboard and click on the Sign out button.

Features or information about Gmail Account

Following are the features which you can get from the below points completely. Before using the Gmail Account you must need to know about the features so that it will help you easily.

  1. User can turn off or delete the web history from your Gmail account which helps you to delete your browser history or Gmail will not capture your browsing history inside it.
  2. At a time you can delete all the emails or you can delete selected items to delete them.
  3. Reminder of file attachment will get while composing mails. If you write “I have attach files” on mail and you did not attach any files and I have click on send to send the mail. You will get one pop up warning that you did not attach any file on this mail.
  4. You can do broadcast of a single message to multiple emails.
  5. Get instant notification while receive any message on your mail.
  6. You can forward and instant reply to any mails from the dashboard.
  7. Backup your phone contacts to Gmail by sync it instantly.  
  8. Get archive you mails to keep it for future use.
  9. You can do video chat with you friends and make calls instantly from the Gmail chat box.
  10. Add people to your circles and keep contact to them randomly.
  11. Create signature on every official and business mails which helps you to auto create that signature in the end of every mail.
  12. If you have slow internet connection then you can switch to basic mode to load the Gmail account rapidly.
  13. This Gmail is very user convenient to patch up with various sites to get notifications.

Hope you all get the proper description about to Create Gmail.com account, login steps and others information and features about Gmail Account. You can also use more and more features while you get login in your account and start using this mail account on your device. We have provided the official link through which you can start to create the Gmail account and after that you use the Gmail dashboard comfortably. There are many types of mail domain present on the internet world but the most preferable and comfortable mail according to user needs id Gmail.com. So start to create your mail ID now and avail all the features provided by this mail to you definitely.

read more
General

Cotton On black Friday

Cotton On is an online cum offline store presented in the US. As Black Friday is a very important holiday for the peoples of the United States of America. Thus customers get very much exiting deals form this store on Black Friday. From the name of this store, you can get understand that Cotton On is a clothing store for Men, Women, and Kids. On this store, people can able to get various discounts depending on the categories of items too. Thus there are many customers from the various parts eagerly waiting to get the best deals from Cotton On store.

Here in this topic, we will provide you the information about the Ad and deals from Cotton On store on Black Friday. The average of customer’s traffic is very much high so you need to visit early to grab the best deals. Sometimes it has happened that due to the high rushes, the deals get expired accordingly. So kindly be quick and fast to get the deal from the Cotton On Store on Black Friday. In the festive season if you want to provide any best Gifts and all then you can choose the best gift items from the particular section of the Cotton On store.

Products, Deals, and Ad of Cotton On Black Friday:

Here we will show you the list of products categories which you will get from the Cotton On Store. Besides that, some of the examples of best deals and Ad are also included for your reference purpose. Let’s have a look at the products, items and the deals which you can able to grab from Cotton On store in Black Friday.

Categories of Products:

If we say about the about the categories of products available in Cotton On store then these are the total list discussed below:

  • Men’s clothing
  • Women’s clothing
  • Baby Wear
  • Kids Wear
  • Teenage Wear
  • Shoes and Accessories
  • Home Décor Items
  • Kitchen Goods
  • Bathroom items
  • Bedroom items
  • Travel Accessories and much more.

Deals and Ad of Cotton On store on Black Friday:

Time to time you can get the best collection of eye-catching products and discounts in each sale. So you have a look at this store to buy clothes and others item through online or offline mode. For the online users, there are many other facilities available which you will get while you will place an order via online.

If you spend over $55 then there is a facility to provide the free shipping of the purchased product at your doorstep. Besides, that user can get the 30 days returns policy if you have no need for the purchased products. Suppose you are a student and you have a valid proof of that then those customers also get extra 20% less in purchases. But all in all, there is particular terms and condition applied to grab every deal and offer from Cotton On store on Black Friday holiday.

If you want to get the more details about the offers and products from Cotton On store then visit the official website of Cotton On once. Rather than that you can contact or visit the nearest Cotton On store for the perfect holiday hour timing and deals they provide to us.

Final Words:

That’s all about the store deals and Ad of Cotton On Black Friday. Besides these, you can get more exciting offers to grab during the upcoming Black Friday hours from this store. The rate of deals and offers may vary depending on the stocks and availability of items in the store. But this is for sure that the best quality of goods you will get from this Cotton On store only. Not only the people of US but the peoples from other countries also come in this store to get the best products at best price during the holiday hours. If we talk about black Friday then in this day also Cotton On provide you the best deals for the people of US and for others.     

read more
1 29 30 31 32 33 70
Page 31 of 70