close

debjit

LifeStyle

How to change themes on WhatsApp? (Using GB WhatsApp)

Hi, friends are you able to apply themes on WhatsApp? If yes then it is fine, hope you know the process. Otherwise, we are going to show the procedure that, how to change themes on WhatsApp. Generally, in normal WhatsApp, it is not possible to change the theme. Only you can able to change the background chat wallpaper only. But using the GB WhatsApp on your Android device you can easily able to change the overall theme of your WhatsApp messenger. All the features of normal WhatsApp are available in GB WhatsApp including the extra customization option too.

Therefore, GB WhatsApp is the best option for you all to customise your WhatsApp in the best way you need. But one thing we want to tell you that GB WhatsApp is officially not available in Google Play. But no need to worry as you can install this app through Apk file also. The Apk file of GB WhatsApp is easily available on various sites for free. Here also we will provide you the proper link to download the GB WhatsApp for free. Let’s start to have a look on those procedures to change the theme on GB WhatsApp for free.


How to change themes on WhatsApp (using GB WhatsApp)?


As we already informed you earlier that it is not possible to change themes on normal WhatsApp messenger. So at first what you need to do is to download the GB WhatsApp messenger and then you can able to change themes easily.


Downloading and installation process of GB WhatsApp:


⦁ Initially, the user should need to get connect their Android phone with proper internet connection.
⦁ Now click on this ⦁ LINK to download the latest version of GB WhatsApp easily.
⦁ Once you download the Apk file now you need to go to Phone settings->Privacy or Security->Unknown Sources->Tap to enable.
⦁ Before installing the Apk files, you just need to enable the installation from unknown sources from security settings.
⦁ Now open the Apk file from the file folder and click once on it to start the installation wizard.
⦁ Once the installation has been done now you are able to use the GB WhatsApp on your phone.
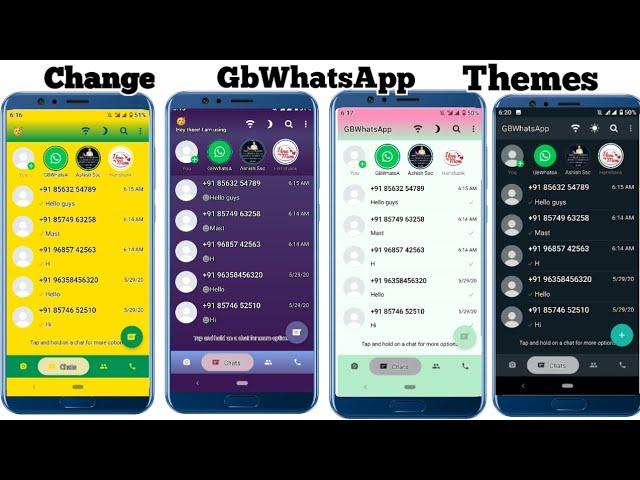
How to change themes on GB WhatsApp?
Now, this is the main section which will show you the process to changes themes on GB WhatsApp. Follow the below steps and apply the same to make changes on your GB WhatsApp currently installed on your phone.
⦁ After completing the downloading and installation process, now open the app from the icon created on your home screen.
⦁ Now click on the Menu option from the top right corner of the app and then choose the GB Settings.

⦁ The next options page will open from where you need to choose the Download themes from there.

⦁ The new window will open which will list out a wide variety of themes from various categories.
⦁ Choose and select your best theme and then click on APPLY Button near the theme.

⦁ Once you apply the themes, now it will ask you to restart the App, and you need to Restart Now by click on Ok button.

⦁ Thus it will change the overall conversation look of your GB WhatsApp.
⦁ In the same you if want then you can clear or remove the currently applied theme also. For that you need to open GB WhatsApp->Menu->GB Settings->More->Clear.


Features of GB WhatsApp:


Hope you all have successfully changed the theme on your GB WhatsApp. If you are done then now get ready to know about the special custom features provide by GB WhatsApp for all.
⦁ You can easily hide the blue ticks, last seen and double ticks from others.
⦁ Inbuilt themes to download and apply for free.
⦁ Change the ticks and the chat bubble mods as your own choice.
⦁ View the files (media) once before you start to download it.
⦁ Instead of 16 MB videos, you can send up to 30 MB of video files at a time.
⦁ Show online continuously and disable the audio call feature.
⦁ Change the app icon color and put 250 characters status instead of 150 characters and much more.

So these are all about the process how to change themes on WhatsApp. The total customisation is only possible with the GB WhatsApp only. If once you download this app form the link given above then it will be easy to apply theme on WhatsApp easily. There is no limitation in this app if you compare it to the normal WhatsApp from Google Play. Once somebody gets bored in using the normal official WhatsApp, then they must try the GB WhatsApp once. We hope this topic will provide you the best support in customising the themes and other features in WhatsApp after reading the full content properly.

read more
Technology

Image to PDF converter

To convert an image file to PDF file is quite easy if know the proper process. But sometimes it is
similarly very much hard if you have no idea about conversion system. That user who knows about
the process to convert the image to PDF then it is ok for them. But those who do not know then they
can definitely go through our context which is mentioned below. There are various processes
through which you can convert the Image file to PDF format. You can choose any one of our
preferred processes to convert the image to PDF for free. Like you can use online drag and drop
process to convert into PDF, use converting software, use direct printing option etc. So, whatever
you think that it is easy for you, you can select that process for an image to PDF conversion.

Here, on this topic, we are going to start discussing the various processes through which you all can
easily convert the image to PDF format. If anybody wants to do the reverse action then they also can
do the same and we will definitely mention those reverse action process. Now we are going to
mention the processes for converting any Image to PDF file format in the points given below.

Processes to convert Image to PDF file format:
As we already told you that there are several processes to convert the image to PDF file format only.
So here we are going to list out those processes to convert the image to PDF file format. Let’s have a
look at those processes given below.
Process No. 1- Using ‘nova PDF 8’:
So at first, we are going to convert the image file like – JPEG, JPG, PNG, BIF etc. with the help of nova
PDF 8 only. To download the ‘nova PDF 8’ software then CLICKS HERE now. After download the nova
PDF 8 file from the given link, you need to install it on your PC (Windows XP Service Pack 3 and
later). Now you need to open the image file into Windows Photo Viewer. From the top bar of the
Windows Photo Viewer, you need to click on the Print option or directly press Ctrl + P to open the
Print Window.

The Print Pictures window will open and you need to select nova PDF from the print drop down list.
Now select the paper size, no. of copies you want to print, set the colour, or if you want other
printing option in nova PDF then click option -> printer properties. Now click on Print Button and
select the destination in which you want to save the file from “Save PDF File As” window. Thus the
image file will successfully convert into PDF format and saved in your selected destination folder.

Process No. 2 – Using online Drag and Drop process:
Now you have reached to the section from where you can get know about the easiest process to
convert the image to PDF via online process. This is very simple as you need to connect your PC to
the internet via LAN or Wi-Fi and open the URL http://jpg2pdf.com/ and upload your Image file by
click on the UPLOAD FILES button. Choose your selected image file from the source folder of your
PC. After that, the server will automatically upload the image and converted into PDF file. Now on
the site, you need to Click on Download button and the PDF file of the converted image will get the
download on your PC.

Process No. 3 – Using ‘JPG to PDF’ free download Software:
If you want to convert the JPEG image file into then you need to download the JPEG to PDF
converting software by click HERE. Now after downloading the software EXE file, you need to install
the application on your PC. The app launching icon will be created on your desktop and thus the
application will be ready to use. Open the app and follow the on screen guidelines to proceed for
converting JPG image to PDF format.
How to perform the Reverse Action i.e. PDF to Image Again?
The process to convert the PDF file to the Image format again then you needs to simply go through
this URL https://docs.zone/pdf-to-jpg. Go to this site and select the appropriate PDF file from your
local disk and it will upload to that site server. Click on the start button and thus the process will
start to convert your file. After converting save that file on your computer.
Otherwise, you can visit this URL https://www.freepdfconvert.com/pdf-jpg and start to convert your
PDF file into image file very easily. Besides that, you can get another browser extension to download
for converting the Image to PDF or PDF to Image format very easily.

Features of using Image to PDF Converter:
There are some best features which we are going to mention here about to using the Image to PDF
converter.

  1. The process of converting Image file format into PDF format is very easy with the help of an
    online and offline converter.
  2. Every process is simple to operate and the interface is very much user-friendly.
  3. You need not pay a single penny for Converting Image file to PDF file format.
  4. Fast, simple and recommended procedure for all the beginner and advanced user.
  5. These processes can save your time and thus complete your work without any
    complication.
    If you want then there are many other online sites and software present to convert any file format in
    others. But if we talk about to convert Image to PDF for free then these are some best and simple
    process for you all. Here we have provided all the proper Links and information to convert the image
    into PDF file format. According to your needs, you can use any offline and online method to convert
    your image into PDF for free. Hope you all are satisfied with the information which we have provided
    in the context mentioned above.
read more
Technology

Go Keyboard APK


Go Keyboard is a very useful and user recommended best key board application. Everybody needs comfort ability while they typing any messages, searching some content in their smart phones. The dedicated keyboard which is remaining pre-installed in your smart phones while buying a new phone is totally simple. You can’t able to find much amount of customisable features on that integrated keyboard. So every user’s needs, specially the girls need some fashionable extra ordinary key board application for android smartphones. More than 20 million of user still now in world-wide has using this keyboard.


Those users who want this app can able to download this app easily from some of the best APK websites and also from Google Play store. More about downloading and installing this app will discuss below. This app just replaces your boring keyboard from the phone screen and just explores your typing environment with a beautiful new looking key board. This app rewarded as the best keyboard app in the Google Play store of the year 2016 in all over 10 countries. All about this application will be discussed below so have a look upon this.


Features of Go Keyboard APK-Some of the best, exciting and beautiful features provided by this application is discussed below. So let’s have a look upon this.
Those who are very much slower in typing speed or sometimes write the incorrect words, they can change it by using the Go Keyboard. It makes your typing speed fast and correct also.
⦁ You can find variety of fonts, lots of mojos, smiley, etc. to key tone with your favourites anytime.
⦁ This app provides fun to the users and provides lagging free experience while typing.
⦁ When you are using the normal keyboard which is inbuilt in your phone it can feels you bore with its dull interface. But when you are using the Go keyboard it can comes up with 10000+ varieties of colourful themes which you can get used with this keyboard app.
⦁ The 100+ different fonts can helps to type smoothly through-out the keyboard.
⦁ A wide variety of 60 languages has been provided by this app for comfortable typing in any language depending upon your needs.
⦁ The mojos and stickers provided by this app can easily support with all the popular useful apps.
⦁ You can download or add free pack of almost 800 emoticons and sticker in your Go keyboard.
⦁ Select and set the weekly recommended themes and wallpapers as your keyboard background.
⦁ While you are typing any mismatch word or any incorrect word, the keyboard will automatically suggest you the correct word to make the typing easy and smooth.
⦁ Gesture typing is also supported in this app with different layout like QWERTY, QWERTZ, AZERTY etc. for your smartphone, phablet, tablet etc.
⦁ The voice recognition input also supported. When you speak something, the keyboard will automatically suggest the related word against your voice pronunciation.
⦁ Go keyboard will never take the personal information from the keyboard as it cares about Privacy and security of the users whatever they type.

GO keyboard APK- How to download it?
Go keyboard can be able to download with the help of below procedure. Please follow the below steps for downloading the Go keyboard application.
⦁ Open any browser on your Phone and type Go Keyboard APK in the search bar and you will find the correspondent link to download that APK file.
⦁ Click on the first recommended site and the site will get opened quickly.
⦁ Find the download link from the site and the download will start automatically through your browser.
To download the Go Keyboard APK “click on this link”.


How to install Go Keyboard APK file?
Here you will find the easy step to install the Go Keyboard APK in your phone and make it useful –
⦁ Open the downloaded APK file from your phone file manager and click on that specific APK file.
⦁ You will get a pop warning that installation from the Unknown Sources has been off from the security and privacy settings by the admin of this phone.
⦁ So you have to go in your phone settings->security and privacy->Unknown sources Installation->Turn On. You can turn it off again after once installation done.
⦁ Again open that APK file and click to install it, the installation will be done automatically.
⦁ Once installation completed you will see on tab in the bottom of the screen to open that file.
⦁ Click on Open, then keyboard app will show you one pop up to grant the permission to access your phone keyboard data.
⦁ Now you have to allow the permission and the keyboard will be get integrated automatically in your typing screen.


Install the app from Google Play store directly.
You can easily install this Go Keyboard app from Google play store also. Steps are given below –
⦁ Open the Play store app from your Android Phone app drawer.
⦁ On the top search bar type “Go Keyboard”.
⦁ The results will display on a listed form.
⦁ Choose the first app from the result and the app description will open.
⦁ Click on the install Button, the installation will do automatically.
⦁ After installation completed you can find your app on your app drawer.
“Click here” to download this app from Google Play store.
So these are all about this keyboard which provides every user a pleasant feel during the time of typing in their smart phones. Those links which are given on the above description is totally secured to download this file and 100% virus free such that you phone will not get harmed. This is a top recommendation app from the developers for using as a keyboard application by replacing your old boring phone keyboard.

read more
Technology

How to Backup Old DVDs before they No Longer Work?


Keeping the files in DVD is an old trend if we compare with the present days. In those times, we generally use a large number of CDs and DVDs for many purposes. It was the most common and easiest way to keep copy your files for future use. You can also burn the files on DVDs and then play it on the DVD player, Computers, and Laptops for listening audio, watching movies and much more. After that, the DVDs have replaced with USB pen drives and external Hard drives as well. However, one of the main problems in DVDs is that it will no longer work if scratches come to the shining part of the disc. So here, we will tell you how to back up old DVDs before they no longer work.

The main disadvantage of the DVDs is an aging problem, which comes due to lots of scratches, corruption, and many more. While these events get more in the DVD disc, then it became unable to play on the Player and they will no longer work. At last, you have lost your important data from that DVD. Now, you need not get worried, as there is some better solution waiting to backup old DVDs before they no longer work.
Proper guide – How to Backup Old DVDs Before they No Longer Work?
Here we will show you the systematic procedure to back up the old DVDs into a new DVD. The whole work will be done by using the special application name WinX DVD Copy Pro. This app is easily available to download from its site and from other links too. The best thing about this software is that it supports all types of DVDs to work in it without any failure. So let us have a look at the steps to make it work for your needs.
⦁ At first, you need to download the WinX DVD Copy pro on your PC and install it accordingly as like the process you follow to install any .exe files. This software is easily available to download in all versions for Windows XP to Windows 10 as well. At first, download the trial version and test the features for the initial use.
⦁ Now open the software after installing on your PC. When you will launch this software, there will be a left sidebar open with multiple options to choose.
⦁ Choose the option Clone DVD to DVD, which is, holds under the Full DVD disc Backup section.
⦁ Now insert both the old and new DVD on your System to copy the data from one to another. If you do not have two optical drives in your system then copy the data of one DVD on your PC drive and make sure, you have at least 9GB free space to copy the data of one DVD.
⦁ So select the location to save the file as a temporary folder.
⦁ Open the old DVD and insert the new DVD where you need to burn or copy the new data to new DVD. Once you insert the new DVD, it will pop up the window where you need to click on Burn and then click on Run button.
⦁ That is all you have successfully burned the old DVD files into the new one successfully.

Features of WinX DVD copy pro:
Hope you all have back up successfully the old DVD files into new one without any hassle. If you are done, then start to know about the features of WinX DVD copy pro from the points below.
⦁ WinX DVD Copy Pro is available free for the first user. It gives you the giveaway offer, which you need to grab it to use this software freely.
⦁ If your DVD goes very old and just you need to recover it with a new one then you can use the ISO tool to give a fresh look. Free of the cost you will create the ISO file of the old DVD and save it on your system for long life use.
⦁ Do you want to upgrade your old DVD audio video file into MPEG-2 format? Ok, no problem as you can do the conversion with the help of this tool only. After that, you can able to play the file in high-end devices too.
⦁ Section wise copying feature is also available in this software. If you want to skip the corrupted or bad part of the file from the DVD then it is also available through this software. Skip the part and copy the selected section to the new DVD.
⦁ Without losing the subtitles of your original video file, you can make the new ISO or Video TS file as well. This software is a complete solution for doing any DVD work without wasting more time.
⦁ You can directly copy the old DVD to the new DVD and in some few steps; it will convert your old DVD into a new one.
⦁ Total nine types of copy modes are there to perform your work in an easy and effective way.
These are some of the basic features of the WinX DVD copy pro, which you need to know before using this app on your system. All you need to do is download the file once on your PC and install it to avail the complete feature of this application.
Final Words:
Finally, we want to tell you that WinX DVD copy pro is the complete solution to back up your old DVDs before they no longer work. With this software user get the trial version to use it once then feel free to try it for satisfying your needs. We are sure that it can be definitely completing the needs and after that, you will buy the full version too. Another good point is that you will get 55% more discount on it to get this awesome software at a low rate. You can also participate in the giveaway to get this pro version free. Hope this topic is helpful for you all and it will complete you need to back up the old DVDs.

read more
Education

India’s States and Capitals


India is a vast country which is located in the Asia continent. This country is the seventh largest country by its area in total. Officially India is also known as Republic of India which got independent on the date of 15th August 1947. New Delhi is the National Capital Region (NCR) of India. All the headquarters and main Government official units are present in New Delhi. So this topic is all about the India’s States and Capitals. As we all know that the National Anthem of our country India is Jana Gana Mana which is such a wonderful Anthem till now. This country consists of all the religions of peoples like Hindu, Muslim, Jain, Christians, Buddhist, etc. and much more.

Till today our country has total 29 numbers of states and 7 Union Territories. All the states are governed by the Government of India. Besides that there are many places of interest situated for catching the eyes of tourists. Among them some of the best places are Agra for Taj Mahal, Amritsar for Golden Temple, Gandhinagar for Sabarmati Ashram, Howrah for Howrah Bridge etc. and many more like this. Let us have a look to the region wise India States and Capitals in the list below.
List of the India’s States and Capitals:
Our country India consists of the six regions mainly or primarily. They are East, West, North and South, Central and North Eastern region of India. Now we are going to list out the total number of India’s 29 States and Capitals with 7 Union Territories below.

Name of the States with Name of the Capital Cities
⦁ Andhra Pradesh – Hyderabad
⦁ Arunachal Pradesh – Itanagar
⦁ Assam – Dispur
⦁ Bihar – Patna
⦁ Chhattisgarh – Raipur
⦁ Goa – Panaji
⦁ Gujarat – Gandhinagar
⦁ Haryana – Chandigarh
⦁ Himachal Pradesh – Shimla
⦁ Jammu & Kashmir – Srinagar (Winter – Jammu)
⦁ Jharkhand – Ranchi
⦁ Karnataka – Bangaluru
⦁ Kerala – Thiruvananthapuram
⦁ Madhya Pradesh – Bhopal
⦁ Maharashtra – Mumbai
⦁ Manipur – Imphal
⦁ Meghalaya – Shillong
⦁ Mizoram – Aizawl
⦁ Nagaland – Kohima
⦁ Orissa – Bhubaneswar
⦁ Punjab – Chandigarh
⦁ Rajasthan – Jaipur
⦁ Sikkim – Gangtok
⦁ Tamil Nadu – Chennai
⦁ Telangana – Hyderabad
⦁ Tripura – Agartala
⦁ Uttar Pradesh – Lucknow
⦁ Uttarakhand – Dehradun
⦁ West Bengal – Kolkata
Name of the Union Territories Name of the National Capital Territories
⦁ Delhi (National Capital Region of Delhi or NCR) – New Delhi
⦁ Andaman & Nicobar Islands – Port Blair
⦁ Chandigarh – Chandigarh
⦁ Dadra & Nagar Haveli – Silvasa
⦁ Daman & Diu – Daman
⦁ Lakshadweep – Kavaratti
⦁ Puducherry – Puducherry

That’s all about the India’s States and Capitals with all the Union Territories. Go through the list given above to perfectly know about the every states and capitals of India. This is a type of general awareness about India which every Indians should need to know always. In every states of India there are many temples, palaces, zoos, historical monuments and many more things are there to visit. Hope you all are satisfied with the information which we have provided here about the India’s states and capitals.

read more
Technology

How to fix Page Fault in Nonpaged Area Windows 10?


This is a quite irritating problem when you get the Page fault in Nonpaged Area of Windows 10. This problem makes us totally frustrated while we are going to troubleshoot it. This trouble arises basically when your OS i.e. Windows 10 is unable to find the proper files from the memory which needs to execute on that time. This fault occurred from the software as well as from the hardware side also. If you abort or failed to update the Windows updates it will be a software issue. On the other hand if your Windows 10 PC runs on faulty RAM card then it will be a hardware issue.

So this topic will completely help you to know about “How to fix page Fault in Nonpaged Are Windows 10”. If your problem level is so much typical then it will randomly result into BSOD crashes. But still your system will works but frequently you will get the errors in Nonpaged area. So follow the below methods of solution and apply the same procedure on your PC to fix the Page fault.
Procedure to fix page Fault in Nonpaged Area Windows 10
There are some of the best solutions to troubleshoot your problem and hope it will definitely help you to come out from this problem.
Procedure 1:
At starting initially you need to check your hard disk drive for errors. For that you need to open the command prompt window (CMD) from your PC and Run the CMD as an Administrator. Type a keyword “chkdsk/f/r” directly on the CMD window and press Enter button. Now wait till the process takes time to complete properly.
Procedure 2:
Now it’s the time to check system files. For that as at is open the command prompt window and run as an Administrator. In CMD window directly type “sfc/scannow” and press Enter. Now wait till the process has been completed successfully. It will scan your whole system files and check if any errors are there or not and fix it accordingly.
Procedure 3:
This procedure will helps you to check out the Windows updates and Drivers which probably cause the Page Fault in Nonpaged Area of Windows 10. So open the System Settings and find the option Update and Security. Open the option and click Check for Updates in Windows Update tab. Wait till the System checks for the available updates for your PC. Now open the Control Panel Window and select the category Hardware and Sound then Device manager. Select Hardware -> right click and “Update Driver Software”. Check all the options like graphics, audio drivers, webcam, printers and other drivers too. Now after completing the process reboot your system and retest if needed.

Procedure 4:
If the BSOD still fails to load then check for the Windows Page File. So again apply some simple tricks to follow this procedure. Right Click on “This PC” from Desktop and select the option Properties. Now go to “Advance System Settings”. Inside the Advance system settings tab click Settings in the Performance box. Now it’s the time to Change in the Virtual memory box and Uncheck “Automatically manage paging files for all drivers”. Now you can choose or set the custom size for the Page file. Then click OK and its’ done. Now reboot or restart your PC to apply the settings properly.
Procedure 5:
If the above procedure does not solve your problem then at last it’s the time to reset your hardware part. Let’s open your CPU cabinet or the Back panel of your laptop and find the RAM stick. If you face problem in opening the RAM stick then take help from Computer Technician. Open the RAM stick from the slot if you have multiple RAM sticks then open all the sticks from slots. Now reset the RAM on the slots and check for the errors. If the problem still persists then replace your RAM with the new one. It will definitely sort out the Page fault in Nonpaged Area of Windows 10.

Thus finally you will come out from this irritating problem which you are facing on your Windows 10 PC. Hope you get the proper solution to fix page fault in Nonpaged Area in Windows 10 PC. We will also recommend you to properly service your PC after a certain period of time such that it can increase your Computer system life. If any beginner user is not capable to perform these above procedures then you must need to contact any good Computer professional who may help you to apply these solutions on your Windows 10 PC. Otherwise read the above procedures carefully to apply it slowly on your PC.

read more
Finance

How to get free coupons during recharges in Paytm?

Paytm is a most useful bill payment and online recharge site in India. While you are using this app for your need, it can easily save your convenient time always. It is also beneficial for you as you will get free coupons for shopping, eating, and many more. Depending on these here we will show how to get free coupons during recharges in Paytm. There are many terms and conditions also applied for every free coupon which is common in general. Besides that, you can instantly redeem 50% cash backs in Movie tickets also.

Those who are regular Paytm users can know how to get those free coupon codes while recharging in Paytm. The process to redeem the coupon codes is not so tough but you need to follow the proper steps to get them with you. In this topic, we will show you how to get free coupons during recharges in Paytm. Besides that, all the term and condition for every free coupon will discuss here for user advantages. Without taking more time let us have a look at that information from the next point.
Proper Detail – How to get free coupons during recharges in Paytm?
Step by step information is given here which will guide you to get free coupons while you are going to do recharge via Paytm. Those coupons can be applied to various food stores, fashion store, medical purpose, movie tickets, and much more. Let us start to know how to get those free coupon codes.
⦁ Initially, you need to get sign up or register in Paytm if you are a new user. Otherwise, for the existing user, you simply need to log in to the Paytm account. Now proceed to the next step after getting signed in into your Paytm account.
⦁ Now after opening the Paytm interface through the app on your phone or through the browser PC, choose the Recharge section. According to your need, you can choose the mobile recharge, Data card recharge, DTH recharge as you want.
⦁ Insert the required details on the field and you will get the available coupon codes for you. Choose the coupons from various brands with different offers available on the list.
⦁ Like you can get Rs.5 cash back on recharge of Rs. 10. Get KFC flat discount of Rs. 100 if you did the recharge or bill payment of Rs. 300 and more.
⦁ In this way, you can choose your afforded coupons during recharges in Paytm. Keep in mind that there must be terms and conditions applicable to each and every coupon code.
Common Terms and Conditions for applying the free Coupons:
Some of the common terms and conditions for every Coupon are given here for user needs. So have a look at those terms and conditions applied to the free coupon codes.
⦁ Coupons are eligible or offered depending on your recharge and bill payment amount.
⦁ One coupon is applicable for a single time only in their brand store only.
⦁ The coupon will remain valid for a limited period only.
⦁ Flat discount on the application of coupons instantly from the gross amount.
⦁ Sometimes coupons are applicable for the festive seasons only.
Benefits of free coupons in Paytm:
While you recharge or pay the bill through Paytm, it will offer you some of the free discount coupons. So here we will talk about some of the benefits of using free coupons.
⦁ Free coupons help you to pay less from the total or net payable amount.
⦁ More brand promotions and user awareness by offering those coupons.
⦁ User satisfaction using a bunch of deals, offers, and coupons every time.
⦁ You can easily save your money which you have earned hardly.
⦁ Offer those coupons to your friends and family members as a gift in occasions.

That’s all about this topic which says that how to get free coupons during recharges in Paytm. If you think that these coupons are beneficial for you than you all start to use the services of Paytm now. We hope you will get benefitted if you pay your bills, do recharges, book tickets and much more using this Paytm services. The offers are also getting increases if the registered user getting old day by day in Paytm database. Do not wait for more and start to grab the Paytm offers now.

read more
Technology

Hack BSNL Broadband Speed?


If we tell about the best and widest broadband service in India then BSNL (Bharat Sanchar Nigam Limited) is the first one. It provides us the best quality of broadband internet service in all over India. Sometimes due to huge traffic in some particular area, it has been found that the speed has been gradually coming down for a long period of time. In that moment we face the main problem while surfing the internet for important works. Today in this topic we will show you some process to hack BSNL broadband speed. May some of you already knows and apply those entire hacks to boost up your internet speed.

If you are done with the steps then it is ok. But those who do not have any idea about those steps, they can surely go through it from the points below. By default according to the plan, the BSNL claims you to give the 2Mbps Speed as usual but after some period of time, the speed decreases to 512Kbps. But it seems that the monthly limit is not reached but still the speed has been decreased. So here in this topic, we will show you how to hack BSNL broadband speed without boosting your plan.
Best tips to hack BSNL broadband speed:
If you are facing the problem of slow internet speed in BSNL broadband, then follow our tips now. These tips are basically helpful for boosting the internet speed which is to apply as a user. After that, if you are facing the same problem then you need to contact with network service provider.
Let’s have a look at the tips given below about to hack BSNL broadband speed.
Tip 1: Increase Limit reservable bandwidth:
The first tip is to increase the value of Limit reservable bandwidth of your Network connection. After increasing the value of this bandwidth, may your downloading speed will get increased in BSNL broadband. To perform this above changes you need to follow the steps given below.
⦁ If you are using Windows Vista/ Windows XP then go to Start button and then type RUN and click Run to open the run command Window. For Windows 7 and later you need to install the ‘Group Policy Editor manually’ at first and then go to Start>>Run.
⦁ Now type the command gpedit.msc for all Windows in the Run command box. Thus it will open the group policy editor on your PC.
⦁ After that you need to navigate to some of the folders in this policy editor like Local Computer Policy>>Computer Configuration>>Administrative Templates>>Network>>QOS Packet Scheduler>>Limit Reservable Bandwidth. All these are present on the left pane of the editor screen.
⦁ After that, you need to make the changes in the value of Limit Reservable Bandwidth from 20 to 0 simply.
⦁ Thus it will change the BSNL DNS to the third party DNS and it will help you boost the broadband speed.

Tip 2: Using TCP optimiser software:
The second hack or tip to increase the BSNL broadband speed is by using TCP optimiser software. Have a look on the steps to get know about the tricks to use this software for boosting up your internet speed.
⦁ At first, you need to download the ‘SG TCP Optimiser’ application on your PC and install it accordingly. This is a third party software through which we are going to increase your internet speed.
⦁ After installing this software, open it and go to General Settings>>now increase the speed bar according to your need.
⦁ Now click on the button ‘Apply Changes’. That’s all you are done.
Tip 3: Using Google DNS:
Another helpful process to increase you BSNL broadband speeds is through changes your IP4 settings. Here you need to changes the DNS from default to Google Server DNS. To perform this operation you need to click on Windows Button>>Control Panel>>Network Sharing Centre/Connections>>Local Area Connections>>Properties>>TCP/IP.
Now after opening the interface, you need to make some changes in DNS. Replace the default DNS server with the below one:
Preferred DNS Server: 8.8.8.8
Alternate DNS Server: 8.8.4.4 and now click on OK button. After that, you need to restart your internet connection once to make the proper changes.

Besides that, always try to clear the cache from the browser, which you regularly used for internet browsing. Regularly clearing the cache also speed up your internet connection.

These are all about the process to hack BSNL broadband speed. If you are still facing problem then, once you need to upgrade your network adapter software. Otherwise, you can contact to your Network Service Providers for more. Hope you all are satisfied with the tips which we have mentioned here about to hack BSNL broadband speed. As BSNL is the best broadband internet service provider in INDIA so we always recommend you to use this connection as usual.

read more
Entertainment

How Much Does Netflix cost?


Netflix is an entertainment company from America, which was founded on August 29, 1997, in California. This company specializes in streaming Movies, TV Shows directly on your PC or Smart TV. But, the main point is how much does Netflix cost you. Before streaming movies and shows, you need to buy a subscription for a monthly or yearly subscription. The price of a subscription also varies from country to country. Thus, here in this topic, we will talk about the cost of Netflix for India as well as for other countries.

Netflix provides you the subscriptions in two ways. One is DVD/Blue Ray only for the US and the streaming only for all other countries including the US. So if you are from India then choose the Streaming service for the monthly or Yearly purpose. Additionally, they also provide you the limited and unlimited plan for the frequent users. So let us have a look at the main point i.e. how much does Netflix cost.
Basic Guide – How much does Netflix cost?
Now we will start to talk about the Netflix cost for the US as well as for India. As we have already told you that Netflix DVD/Blue Ray is available for the US only. While the HD and Ultra HD streaming is available for India and US as well. So let us talk about the cost of Netflix plans in terms of both the categories.


⦁ DVD/Blue Ray Plan (Only US):
At first, we will talk about the DVD/Blue-ray plan. The DVD plan depends on the quantity of DVD discs you are purchasing at a time. You are also able to add the Blue Ray, which cost you more than DVD. If you choose the Blue Ray plan then you can take the DVD versions also. But with DVD plan you can’t take Blue Ray. You can also choose the limited and unlimited plans as well.
The limited plans are for only one DVD at a single time. Maximum two DV you can buy in one month. But, the unlimited plan depends on terms and conditions.
If we talk about the price then for limited plan per month you have to pay $4.99. Whether for the unlimited plan you have to pay the cost, which ranges from $7.99 to $52.99. This cost depends on how much disc you are choosing and Blue ray is there or not.
The above services are only available for the US.


Streaming Plan (India and other):
On any internet network, Netflix allows you to purchase the streaming plan. This plan is quite less than the DVD plans. For $8.99 (US), you can purchase the monthly streaming plan. If you have already subscribed earlier then the price may decrease to $1.
Now for the Indian Users, the Netflix streaming plans may vary from $5 or 319.13INR to $20 or 1276.50 per month. Besides that, there is an option to choose the single screen or double screen and higher with standard and HD quality as well.
Please make sure that you are choosing the best plan and the price sometimes gets vary according to company’s terms and condition.

Netflix Subscription:
The next point is about the plans for getting subscribe in Netflix. This price is also getting upgrade and downgrade at any time. So, there are total three plans available for all the users globally. One is Basic, the Second one is Standard and other is Premium.


⦁ Basic Plan:
The basic plan is available to watch movies and other shows in the standard quality. It allows you to access the service at one device at a time. Presently it costs you 500INR for one year and first month free. You can watch unlimited films and TV shows on one screen at a time.


⦁ Standard Plan:
Standard Plan will cost you 650INR in which you can get the HD quality with two screens available. Besides that, the first month is free for you with unlimited films and TV program. You can also cancel at anytime and choose another plan as you need.


⦁ Premium Plan:
Premium plans allow you to watch HD and Ultra HD videos with four screens at a time. This plan cost you 800INR with first-month free use. Besides that, all the other features are also available for the premium users on a yearly basis.


Final words
At last, we want to tell you that if you want to enjoy the online TV shows and movies without taking the download headache then Netflix is there for you. Before choosing your subscription please visit the official website of Netflix and get, the updated plans according to your need. Hope this topic about how much does Netflix cost is helpful for you all. Have a great day and enjoy your favorite movies and shows via Netflix now.

read more
Technology

How to Schedule Text Messages on Android?


This is very important for us to maintain the proper time in our daily life. Depending on this sometimes we need to send some important messages on the proper time. But somehow we forgot to send it in the actual time. If we need to send any official or business related messages to our boss or clients then we need to follow the proper timings. But depending on the importance of message we forgot to send it and thus it create a bad and imperfect impression upon us. Most of us use the Android phones and in some models like in Samsung mobiles schedule message feature is remain pre-installed. But for other phones we will show you the perfect method to schedule text message for send it later.

How to Schedule a Text Message on Android in 2024


We are going to write this topic to explain the ways that how you can schedule your text message for send it on a schedule time. This feature is very useful for every officials and business users at all. So you need not take any tension for sending messages on that time whether you remain busy. Before you getting busy you can create the message and set up the timing in which you want to send this message. Then the message will automatically send from your phone to the recipient’s phone. So have a look on the below points to know how this feature work in your phone.


Ways to Schedule Text Messages on Android Phone


As we already informed you that except few brands like Samsung, LG you cannot get this Schedule message feature pre-installed on your phone. So now you need to install some of the best apps through which you can easily use this feature on your phone. Basically these schedule message app is available on Google Play through which you can instantly download and install these app on your phone.
Some of the best apps which will help you all to schedule and send the message later on your Android devices are given below.


Pulse SMS-
This is a very popular and good app to schedule your text message and send it according to your perfect time. This app comes up with the best messaging experiences and the interface is just like your default app. But the main feature you will get through this app is the Schedule message feature. For that you need to type your message and then tap on the Menu on the top right corner and then you will get the Schedule menu option. Click on that option and you can able to set the time and date in which you want to send the message. Now you message will sent automatically to receiver’s phone.

Schedule SMS –
Schedule SMS is a type of Ad-On which will work with your stock messaging app. Just you need to install this Ad-On on your phone and you can use this feature instantly. Now in the interface you find one Plus icon where you need to compose or type your text message and set up the date and time to send this message on the schedule time. This app is totally free to use and work in most of the Android devices.

Textra –
Textra is another message scheduling app presently available in Google Play. User can easily download this app from the Play store and thus easily use to set the schedule time to send the preferred messages easily. Go to your Play store and simply download this app for your phone. Write your message and click on the clock button on the interface and set up the time and date to send the messages.

Besides these apps also you can get other similar apps like Do it Later, Alpha messaging etc. in the Google Play or in the other web sites. You can download their Apk files and easily you can able to send your schedule messages according to your needs. In this topic you have provided with the best apps through which you can easily get the scheduling features in Text messages. For every official and non-official work, having this feature in Android phone is most important for our daily life. Some phones probably come with this feature by default and some other phones do not have this feature. So for those phones you can easily use these above apps and click on the name to start download it instantly.

read more
1 33 34 35 36 37 70
Page 35 of 70