close

debjit

Social

HowTo Change Facebook Page Name & Username & Related Error?

Facebook is a very useful and popular social network site until now in the world. Using this site, you can communicate and keep in contact with your known person from every part of the world. Now, coming to the main point of this topic – how to change the Facebook page name and username and related errors?  Changing all things is something tricky and you can do this by reading our whole content accordingly. The username and the page name will be set by default when we have opened and created the account on Facebook. However, if you send a request to the Facebook management team they will surely change the Facebook Page name, username, and related errors too. This topic will completely guide you to solve these entire problems on a single page only.

Now first, we want to tell you what is page name and what is the username. Therefore, the Page name is the title or the name, which generally appears under your profile picture in the account. This name is also known as the title of the page. It also acts as an identity, which appears when somebody from your friend list tags something you in a post. Similarly, if we talk about the Username then it is the main URL of the page or account, which you have opened on Facebook. This name originally acted as the main address or the link to your Facebook account page. So using those names, you can easily identify your account as well as another account too. Without taking as much time let us have a look at the content written below and read it carefully to know the tweak about how to change the Facebook Page name & Username & related errors.

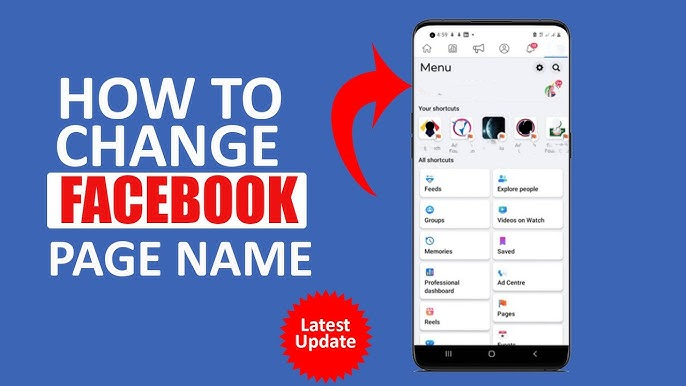
Step-by-step guides – How to Change Facebook Page Name & username & related error?

Here we will show you some of the basic steps and the related information individually to change your Facebook page name and username as well as their related errors. One thing we want to clear you first is that changing the page name and the username of the Facebook Account will disturb your Facebook-connected sites like Blogs, Websites, Email Templates, Other Social Networks, Shopping Sites, Business cards, Signatures, etc. Therefore, the name on those pages will also be changed by changing the Facebook Page name and Username. The old name will be destroyed and the new link will be generated in your account accordingly. Now have a look at the steps given below to Change your Facebook Page name and Username as well.

 #How to Change Facebook Page name and related error?

Hope you have been waiting for a long time to know how to change our Account page name. Some of the users may know how to change their Facebook page name if they try it early. Otherwise, you can simply follow and get to know how to change it by applying some of the steps, which are given below.       

  1. At first, the user needs to log in to the Facebook Account from the desktop using a valid Username and Password.
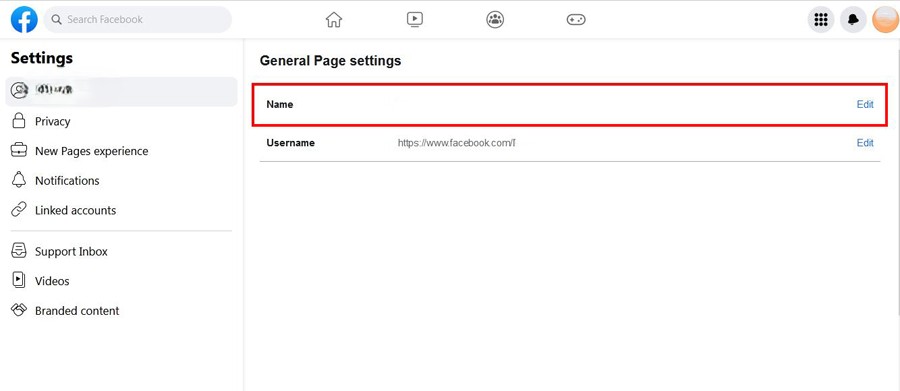
  2. Next to it once you have logged in to your account, then you need to navigate to the left sidebar where About is written. Click on that ‘About’ option once.
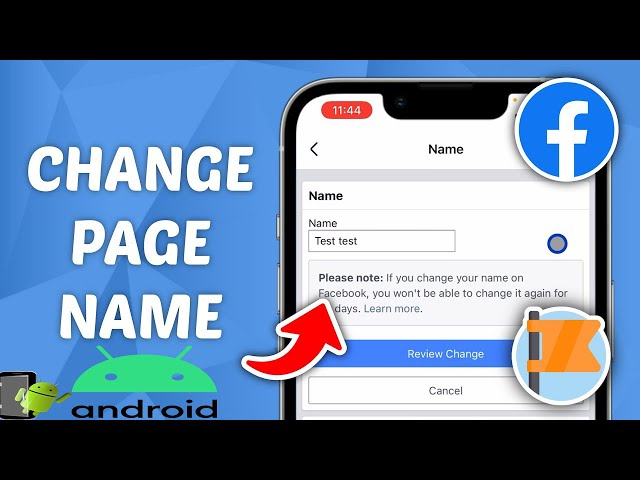
  3. Now the About page will open on your screen and thus click on the Edit option beside the Name.
  4. You are now able to change the Page name. The maximum you can enter is up to 75 characters to replace the old name with a new one.
  5. After inserting the new name, you need to click on Continue.
  6. The verify page will ask you whether the information you have entered is correct. If all are correct then click on Request Change.
  7. Now Facebook management team will accept your request and the changes will be made accordingly from their side as well. It may take maximum 3 days to complete your request so keep patience and wait for it. Once the work has been done you also get an email from the Admin side of Facebook.

Related Error:

Sometimes it seems that for some users, the Edit button is not available to change the Page name. It means that you have recently changed your page name i.e. within the last 7 days. It is not possible to change the page name always.

If you have not gotten the proper permission then you need to contact the admin page.  

Some names are not acceptable to enter in the named place like abusive words, violation of rules, etc. So correct word you need to input with proper alignment and avoid improper punctuation too.

Avoid the special official brand name input in the profile name without having proper authorizations.

How to Change Facebook Username and related error? 

Now to change the Facebook Username, which is the main URL or the link of your account, you need to follow the steps, which are given below. Read them carefully and check for the basic related errors, which you may face during the changing of Username.

  1. As same as the previous point, You need to log in to your account first and navigate to the About page from the left sidebar of the page.
  2. Now click on Edit near the Username.
  3. You will get a maximum of 50 characters to edit your username and input the new one.
  4. Insert the new name, check the spelling, and click on Create Username.
  5. That is all you are done. Even you can also go for the suggested username while creating the new name for your account.

Related Errors:

If you are facing an error in setting up a new name then mind that you can only use the specific name which is not using my other accounts.

The username should contain, A characters, 0-9 numbers, or a sign (‘.’). EG- Joseph.Smith66

Username cannot be accepted with .com, or .net extensions. Otherwise, you will face errors.

Follow the Facebook Rules and regulations or you can contact admin for any errors.

Conclusion:

Finally, we want to tell you that these are all about the topic – How to Change Facebook Page Name & username & related error? Hope you all are satisfied with the information, which we have discussed here in detail. So if you also want to make the same changes to your account then feel free to choose the above steps and apply the same to your account to get the proper result. Moreover, you can share this content with your friends and family members such that he/she can make changes to their accounts easily.

read more
Technology

How to fix “Unable to Connect to NVIDIA”?

“Unable to connect to NVIDIA”, is a known issue faced by most of the desktop as well as the laptop users. So most of the users going to solve it by themselves but some of them can pass to solve it and some of them fail to connect it. So in this topic, we are going to guide all the users that how to fix unable-to-connect NVIDIA problems.  NVIDIA is a computer Graphics card manufacturing brand which used their graphics cards on various brands of Laptops and PCs. Those who love to play high-resolution games on their PCs need to get installed and keep updated with the NVIDIA GeForce graphics.

This is not a big issue to solve this warning or error message from your PC about the NVIDIA. But some users really get tensed when they face or get this error code that is Unable to connect to NVIDIA. So all of you who are going to face this type of error on your PC can follow our below guidelines to fix it permanently. There are many ways to fix this type of issue. But here we will describe some proper procedures that will 100% work with your PC and are very simple to perform.

Solutions to fix “Unable to Connect to NVIDIA”

Now you can get the solutions to fix the errors shown by your NVIDIA software on your PC. So follow the procedures and do the same on your laptops or PCs.

Solution No. 1:

When you get the error at the starting time it can prevent your NVIDIA software from being get started. Now verify which services are currently stuck at the starting period. Click on the Start menu of the PC and then type Run.  Now type services.msc and press Enter. Now verify that at the starting period which services were stuck. In the next step, you need to delete or rename NSManagedTasks.xml named file from C drive –C:\ProgramData\NVIDIACorporation\NetService\.  Before opening this folder you need to show the hidden files in order to view it. After deleting or renaming the NSManagedTasks.xml file then open Task Manager (Ctrl+Alt+Delete) and click on Processes. Select NVNetworkService.exe *32 process and END it. Again go back to services lists and right-click on NVIDIA Network Service to start it.

Solution No. 2:

This is another method that is very easy to fix the problem of starting up NVIDIA graphics. For this, you need to open the official site of NVIDIA now by clicking on this LINK. Now open the Automatic Driver updates which will initiate you to download the latest version of GeForce driver updates. Now wait for some time till you have downloaded the set up of the full up-to-date file. Now uninstall the previous version of the file and start installing the new date version from the setup file. Follow the on-screen instructions and go ahead by following the advice.                                                     

Solution No. 3:

This is most advanced trick to fix the unable to connect to NVIDIA error. Those who do not know about this trick then don’t try it by you because it may damage your GeForce performance driver. So follow the below steps for proceeding.

  • Open your C drive and visit C:\Windows\System32\drivers\etc.
  • Copy the host name in your notepad and save it for back up. If you keep it back up then you can use it for future use also.
  • Now change the local host address from 0.0.0.0 to 127.0.0.1 or you can even delete this host name.
  • Now update the GeForce drivers to the latest version and Start the app again.
  •  It will works now properly after restart your PC for a single time.

So these are all the best useful tricks and proper solutions through which you all can fix “Unable to Connect to NVIDIA” problem. If any users facing any type of problem while applying these procedures then stop this and contact with some computer experts. If you perform any wrong process while applying this solution then it may corrupt your software and may crash your system software also. All the above solutions are totally practical verified and working for all the PCs having NVIDIA GeForce software. Hope this topic will definitely help you about GeForce experiences unable to connect to NVIDIA.

read more
Technology

How to fix Page Fault in Nonpaged Area Windows 10?

This is quite an irritating problem when you get the Page fault in the Nonpaged Area of Windows 10. This problem makes us totally frustrated while we are going to troubleshoot it. This trouble arises basically when your OS i.e. Windows 10 is unable to find the proper files from the memory which needs to execute at that time. This fault occurred from the software as well as from the hardware side. If you abort or fail to update the Windows updates it will be a software issue. On the other hand, if your Windows 10 PC runs on a faulty RAM card then it will be a hardware issue.

So this topic will completely help you to know about “How to fix page Fault in Nonpaged Are Windows 10”. If your problem level is so much typical then it will randomly result in BSOD crashes. But still your system will work but frequently you will get the errors in Nonpaged area.  So follow the below methods of solution and apply the same procedure on your PC to fix the Page fault.

Procedure to fix Page Fault in Nonpaged Area Windows 10

There are some of the best solutions to troubleshoot your problem and hope it will definitely help you to come out from this problem.

Procedure 1:

At starting initially you need to check your hard disk drive for errors. For that you need to open the command prompt window (CMD) from your PC and Run the CMD as an Administrator. Type the keyword “chkdsk/f/r” directly on the CMD window and press the Enter button. Now wait till the process takes time to complete properly.

Procedure 2:

Now it’s time to check system files. For that it is open the command prompt window and run as an Administrator. In the CMD window directly type “sfc/scannow” and press Enter. Now wait till the process has been completed successfully. It will scan your whole system files and check if any errors are there or not and fix it accordingly.

Procedure 3:

This procedure will help you to check out the Windows updates and Drivers that probably cause the Page Fault in the onpaged Area of Windows 10. So open the System Settings and find the option Update and Security. Open the option and click Check for Updates in the Windows Update tab. Wait till the System checks for the available updates for your PC. Now open the Control Panel Window and select the category Hardware and Sound then Device Manager. Select Hardware -> right click and “Update Driver Software”. Check all the options like graphics, audio drivers, webcam, printers and other drivers too. Now after completing the process reboot your systemand retest if needed.

Procedure 4:

If the BSOD still fails to load then check for the Windows Page File.  So again apply some simple tricks to follow this procedure. Right Click on “This PC” from Desktop and select the option Properties. Now go to “Advance System Settings”. Inside the Advance system settings tab click Settings in the Performance box. Now it’s time to Change the Virtual memory box and Uncheck “Automatically manage paging files for all drivers”.  Now you can choose or set the custom size for the Page file. Then click OK and it’s done. Now reboot or restart your PC to apply the settings properly.   

Procedure 5:

If the above procedure does not solve your problem then at last it’s time to reset your hardware part. Let’s open your CPU cabinet or the Back panel of your laptop and find the RAM stick. If you face a problem opening the RAM stick then take help from Computer Technician. Open the RAM stick from the slot if you have multiple RAM sticks then open all the sticks from the slots. Now reset the RAM on the slots and check for the errors. If the problem still persists then replace your RAM with the new one. It will definitely sort out the Page fault in the Nonpaged Area of Windows 10.

Thus finally you will come out of this irritating problem that you are facing on your Windows 10 PC. Hope you get the proper solution to fix the page fault in the Nonpaged Area in Windows 10 PC. We will also recommend you to properly service your PC after a certain period of time such that it can increase your Computer system life. If any beginner user is not capable of performing these above procedures then you must need to contact any good Computer professional who may help you to apply these solutions on your Windows 10 PC. Otherwise read the above procedures carefully to apply it slowly on your PC.

read more
SocialTechnology

How to change themes on WhatsApp? (Using GB WhatsApp)

Hi, friends are you able to apply themes on WhatsApp? If yes then it is fine, hope you know the process. Otherwise, we are going to show the procedure, of how to change themes on WhatsApp. Generally, in normal WhatsApp, it is not possible to change the theme. Only you can able to change the background chat wallpaper only. But by using the GB WhatsApp on your Android device you can easily able to change the overall theme of your WhatsApp messenger. All the features of normal WhatsApp are available in GB WhatsApp including the extra customization option too.

Therefore, GB WhatsApp is the best option for you all to customize your WhatsApp in the best way you need. But one thing we want to tell you is that GB WhatsApp is officially not available in Google Play. But no need to worry as you can install this app through an APK file also. The APK file of GB WhatsApp is easily available on various sites for free. Here also we will provide you the proper link to download the GB WhatsApp for free. Let’s start to have a look at those procedures to change the theme on GB WhatsApp for free.

How to change themes on WhatsApp (using GB WhatsApp)?

As we already informed you earlier it is not possible to change themes on normal WhatsApp messenger. So first what you need to do is download the GB WhatsApp messenger and then you can able to change themes easily.

Downloading and installation process of GB WhatsApp:

  • Initially, the user should need to connect their Android phone with a proper internet connection.
  • Now click on this LINK to download the latest version of GB WhatsApp easily.
  • Once you download the APK file now you need to go to Phone Settings ->Privacy or Security->Unknown Sources->Tap to enable.
  • Before installing the apk files, you just need to enable the installation from unknown sources from security settings.
  • Now open the Apk file from the file folder and click once on it to start the installation wizard.
  • Once the installation has been done now you are able to use the GB WhatsApp on your phone.

How to change themes on GB WhatsApp?

Now, this is the main section which will show you the process of changing themes on GB WhatsApp. Follow the below steps and apply the same to make changes to your GB WhatsApp currently installed on your phone.

  1. After completing the downloading and installation process, now open the app from the icon created on your home screen.
  2. Now click on the Menu option from the top right corner of the app and then choose the GB Settings.
  • The next options page will open from where you need to choose the Download themes from there.
  • The new window will open which will list out a wide variety of themes from various categories.
  • Choose and select your best theme and then click on the APPLY Button near the theme.
  • Once you apply the themes, it will ask you to restart the App, and you need to Restart Now by clicking on the Ok button.
  • Thus it will change the overall conversation look of your GB WhatsApp.
  • If the same you if want then you can clear or remove the currently applied theme also. For that you need to open GB WhatsApp->Menu->GB Settings->More->Clear.

Features of GB WhatsApp:

Hope you all have successfully changed the theme on your GB WhatsApp. If you are done then now get ready to know about the special custom features provided by GB WhatsApp for all.

  1. You can easily hide the blue ticks, last seen and double ticks from others.
  2. Inbuilt themes to download and apply for free.
  3. Change the ticks and the chat bubble mods as your own choice.
  4. View the files (media) once before you start to download them.
  5. Instead of 16 MB videos, you can send up to 30 MB of video files at a time.
  6. Show online continuously and disable the audio call feature.
  7.  Change the app icon color and put 250 characters status instead of 150 characters and much more.

So these are all about the process of how to change themes on WhatsApp. The total customization is only possible with the GB WhatsApp only. Once you download this app from the link given above then it will be easy to apply the theme on WhatsApp. There is no limitation in this app if you compare it to the normal WhatsApp from Google Play. Once somebody gets bored with using the normal official WhatsApp, then they must try the GB WhatsApp once.   We hope this topic will provide you with the best support in customizing the themes and other features in WhatsApp after reading the full content properly.

read more
Game

How To Download Mini Militia For Android?

Doodle Army 2: Mini Militia is the best combat game for Android as well as for iOS. This is a free multiplayer game that you can choose to play online or via local Wi-Fi and Bluetooth connection. This game is played by 6 players online and 12 players using local Wi-Fi or Bluetooth mode. All you need to do is install the game from Google Play for free. Those who already know about this game or currently playing this game may know about the process of downloading too. However, some users still exist who have no idea about the process of downloading this game for Android.

So, you all need not get worried as we are going to discuss the best tricks and ways to download and install Mini Militia on your Android safely. The process is not so tough to perform on your device. But you need to read the steps which we are going to discuss here properly. Carefully read those steps and apply the same task on your Android smartphones to download Mini Militia accordingly. Without wasting more time, let’s start to discuss the way to download mini militia for Android.

Process – How to download Mini Militia for Android?

As we have already informed you all the process of downloading the Mini Militia for Android is not so much hectic. Still, we will show you the best way such that any Android user can download and install it on their phone to play this game easily. Go through the steps discussed below now.

  • Initial requirements, which may all users, know that you should be connecting with the internet before downloading any files. Rather than that you need to log in with your Google ID and password in Google Play Store.
  • Now after fulfilling the above criteria, open the Google Play app on your phone. While you have this app, you will get the search bar on the top of this app.
  • Here in the search bar type the keyword Doodle Army 2: Mini Militia. And now wait for the search results against your current search.
  • You will get the name of this game on the top of the list which you need to select once.
  • After that read, the details of the game described there with all the terms and conditions at all.
  • Click on the Install button after reading the description and thus the game will start to download on your device accordingly.
  • Wait till the game has completed the downloading process from Google Play.
  • Once after finish the task of downloading, it will automatically start to install on your phone. Hence after installation has been completed, the app icon will be created on your home screen or app drawer menu.
  • Click on that app icon to launch this game for playing with your partners.

Key features of Mini Militia for Android:

Before starting to play this game, the user needs to know the available features of this game. So, here we will provide you with the key features available in this game.

  1. It is a multiplayer Combat game to play with 6 players online and 12 players via local Wi-Fi.
  2. User-friendly interface for playing this game smoothly.
  3. Zooming features in controls for extra comfort in your gameplay.
  4. The game is operated online via Game Center and locally you can play multiplayer via Bluetooth or Wi-Fi only.
  5. It comes with dual joystick intuitive controls for giving best comfortable gameplay experience.
  6. It has open-world maps to find the locations in your gameplay.
  7. For extended vertical and faster movements, you can choose the rocket boots also.
  8. A wide variety of weapons like Guns, dual wield, etc. to fight against opponents.
  9. The battle is to start with a team such that your side will become stronger to beat the enemies.

That’s all about the Mini Militia for Android to download for free. If you think that you need some of the combat games then you can opt. multiplayer-based Mini Militia game for Android, This is one of the best multiplayer games for both Android and iOS too. Hope you all are satisfied with the content which we have written here about how to download Mini Militia for Android. If you feel that this game is perfect for you try it once from Google Play.

read more
Crypto

How to buy the first Ripple?

For advanced users, it is not so tough to buy Ripples. But beginners do not know how to buy the first Ripple. No need to get worried as this topic will guide you about how to buy your first Ripple XRP in detail. We have grabbed some of the best ways through which you can purchase your first Ripple in a safe and secure way.  One thing we want to clear you that the fastest and free service is provided by Ripple to make payment globally.

You can use a variety of methods according to your satisfaction to buy the first Ripple. There is no any direct process to buy the Ripple XRP. But using the services from other companies you can easily buy your first Ripple. Now we will start to give you the full details to buy the first Ripple using the following methods discussed below.

How to buy the first Ripple using various ways?

Use Ripple Wallet

Do not store or hold the Ripple on exchanges. Choose the digital wallet or offline wallet like Ledger Nano S to store your XRP in a safe zone. Then you are free to send and receive your payments with XRP.  

Ripple is a crypto currency which cannot be mined. Thus user needs to purchase the Ripple using the following processes given below. We are listing out the basic detail to buy the Ripple with every source given below. 

·      Using Coin Mama:

At first, we will talk about the Coin Mama. Coin mama allows you to buy the Bitcoins using your credit card from any country in an ease. After buying the Bitcoin you just simply need to convert the Bitcoin into Ripple XRP using the Binance service.

·      Using Bit Panda:

As like Coin mama, you need to buy the Bitcoin using the Bit Panda at first. Once you have bought it using your credit card, now convert the Bitcoin to XRP using Binance.

·      Using Bank Account:

If you are living in the USA then you need to use your bank account to purchase Bitcoin via Coinbase or like a similar service provider. After purchasing the Bitcoin, simply convert the Bitcoin into XRP using the service of Binance.

On the other hand, if you are living in Europe just use the Bit Panda. Rather than that for other countries, the site will find the Bitcoin exchange service which accepts the bank transfer. Then you can convert the Bitcoin into Ripple within 10 minutes.

·      Using PayPal:

Directly user can not able to buy the Ripple with PayPal. At first, you need to buy the Bitcoin via PayPal. Then use Binance to convert your Bitcoin into XRP.    

·      Using Bitcoin:

As we already told you that there is no direct way to buy the Ripple in general. Thus you need to purchase the Bitcoin at first via various sources. And then convert the Bitcoin into Ripple XRP using the Binance or like similar services.

·      Using Cash:

At first, we want to tell you that purchasing XRP with cash is not available yet. So you can buy the Bitcoin at first with your cash and then just simply convert the Bitcoin into XRP using the service like Changelly.

·      Using Ethereum:

Ethereum is easy to grab using mining, buy with cash, credit cards and much more. Thus after purchasing the amount of Ethereum, you can exchange or convert it into Ripple accordingly. Directly there is no way to purchase the Ripple XRP with Ethereum. 

·      Using Skrill:

Only the Bit Panda allows the Europeans to purchase the Ripple with Skrill. Rather than that there is no way to use Skrill for buying the XRP or Ripple.

Final Words:

Finally, we want to suggest you that before investing your money in crypto currency please be safe as always. Because there are some fraud exchangers also available who grabs your money by applying the name of reputed companies. Without knowing the current market values and trends do not invest your money in digital currencies. Hope you all are satisfied with the information provided here about how to buy the first Ripple using the above methods. If you also need the same service then feel free to contact the official site of Ripple for getting more details.  

read more
General

How to become Paytm VIP customer?

Doing the KYC to every banking account and online wallets is important now a day. The service agent’s call from every company is coming to the customers to complete the KYC process as possible. Thus it is confusion for the Paytm customer that how to become Paytm VIP customer by upgrading Paytm account with KYC. To throw out the confusion from the mind of the customer, we are here to show you the complete procedure to become Paytm KYC VIP customer.

Even now a day we need to do the KYC of our mobile numbers by linking it to Aadhaar. Otherwise the network service will get stopped in our Sim without any further notice. This topic will tell you the complete process to upgrade your Paytm wallet to become VIP customer. As Paytm is the largest digital wallet in India, so you will get more benefits after becoming Paytm VIP customer as well. Let us have a look on the process to become Paytm VIP customer.

How to become Paytm VIP customer?

To become the Paytm VIP customer, you need to complete the KYC at first for your Paytm Account. After completing the KYC, you are eligible to get the benefits of Paytm VIP customers. Following the below step by step process, you can able to do the KYC for your Paytm Wallet to became VIP customer.

  • Initially, the user needs to open the Paytm app from their smartphone, either from iOS or Android phone.
  • Open the app and log in to it using your login credentials.
  • While the dash screen of Paytm app will open, go to the menu ‘Paytm KYC’ to complete the KYC process.
  • Enter your Aadhaar Card number and mobile number associated with it to proceed for next screen. If you don’t have Aadhaar card, then you can choose other Govt. ID proof from the list given in the interface.
  • Insert the requested information in the required fields to complete every step.
  • After that, you need to ‘Submit’ the details and wait for the OTP to get receive on your registered mobile number. Enter the received OTP and verify it completing the details at all.
  • That’s all you will get the confirmation message on your screen that ‘You are now enrolled in Paytm VIP Programme’.
  • Now visit any one of your nearest KYC centers and verify your original documents to the KYC agents and thus you are done completely.

Documents needed:

Any of the following documents you need for doing KYC to become Paytm VIP customer:

  1. Aadhaar card
  2. Voter ID
  3. Driving License
  4. Passport
  5. NREGA job card

Benefits of Paytm VIP customer:

Following are some of the benefits which you can get after becoming the Paytm VIP customer.

  • More offers with exclusive cash backs are there for you.
  • Add money beyond the normal limit to your wallet.
  • The endless spending limit for you.
  • You are eligible to open an account in Paytm payment Bank too.

The above steps are the complete guide which you can apply to become Paytm VIP customer. Hope every reader is satisfied with the information given here about how to become Paytm VIP customer. As already we told you that Paytm is the largest digital wallet in India. So make the cashless transaction you can surely use the Paytm for the available needs offer by this platform. That’s all for this topic and have a great day.   

read more
Technology

How to add Sound Equalizer on Windows 10/8.1/7

If you are a music lover then it is essential to have a sound equalizer on your PC. Whether your PC runs in Windows 10 or 8.1 or 7 there is no problem as you can easily add custom equalizer. In Windows there is no any equalizer comes in build or dedicated with your PC.  But there is some equalizer keep remain attached with media player applications. This equalizer is not at all sufficient for your PC. If you need to control or change the System sound then you need to download the custom system equalizer only. There is one very easy method present through which you can add the default system sound equalizer for Windows 10, 8.1, 7.

Here in this topic, we will discuss how to add sound equalizer on Windows 10/8.1/7. If you have windows 10 or 8.1 or 7 PC then you can follow out methods which we are going to discuss below for adding sound equalizer on Windows 10, 8.1, 7. If you add any Windows player or iTunes in your PC, it will automatically tune the sound from the installed new equalizer directly. Let’s start to get know about the steps to add sound equalizer on your PC.

Process – How to add sound equalizer on Windows 10, 8.1, 7?

Now we will start to discuss the procedure how you can properly add the sound equalizer on Windows 10, 8.1, 7. Follow the steps mentioned below and apply the same in your PC.

Pre Requirements:

  • At first, you need to keep ready with your Desktop or Laptop and make sure proper audio driver is installed in your PC.
  • Must be connected with one internet connection either by LAN or Wi-Fi.
  • One user account with admin privileges to install apps.

How to download and install “Equalizer APO” for Windows 10, 8.1, 7?

So here you have reached to the section from where you can start to know about the process to download the Equalizer APO for Windows 10, 8.1 and 7. Follow the below instructions to download and install Equalizer APO.

  • At first, you need to connect your PC to the internet and go through this Links Equalizer APO – Win- 10 / 8.1 / 7 – 32 Bit and Equalizer APO – Win- 10 / 8.1 / 7 – 64 Bit to download the setup files.
  • When you will click on the above link, it will automatically redirect you to the download page to start downloading the setup of Equalizer APO directly through your browser.
  • Wait till the process for downloading has been completed successfully and the file will get saved automatically in your download folder of PC.

Hope you all have downloaded the Equalizer APO successfully on your PC. If you are done then you can get ready to proceed for the installation part. Go through the steps below to start installing the Sound Equalizer on Windows 10, 8.1, 7.

  • Open the download folder and find out the set-up .exe file where you need to double click once to start the installation wizard.
  • While the wizard will start, it will open one window where you need to give permission for selecting the playback devices like Headphone, speaker etc.
  • After you have selected all the Playback devices now you need to click OK button.
  • Now you are almost done as the last installation part will be done automatically.
  • Once the installation has been completed now it will ask you to restart your PC which you need to do once for the successful completion of installation part. 
  • After restarting your PC now you can control the Equalizer with the help of front end Equalizer GUI. But you need to download and install this GUI once by Click on this link PC Equalizer GUI for Win 10, 8.1, 7.
  • Now after downloading the GUI, install it, in the same way, like before and open the GUI in which it will ask you for a grant the permission to access your files. So click ‘Yes’ once.

Thus your equalizer has totally completed the process of installation. Click the GUI icon for launching the equalizer as it already gets integrated with system sound driver. Launch the control panel of Equalizer and set the levels for your BASS, TREBLE, Boost, etc. according to your own comfort ability.

That’s all about the steps to download Sound equalizer on Windows 10, 8.1, 7 PC. Here we have provided the total workable simple steps to add sound equalizer app. The Equalizer APO is very good software which will get integrates with your system sound and thus you can tune the sound according to your own pleasure. So this is the total information which we want to provide you all for add the default system sound equalizer in Windows 10, 8.1, 7 PC. Hope the information which we have mentioned here will come useful for you all and we will try our best to provide more in future.    

read more
General

How mobile insurance works?

If you are going to purchase a new Mobile Phone, then do not forget to buy mobile insurance against it. While a customer went to a mobile shop to purchase a phone, the shopkeeper generally, provides various offers in it. Among them, mobile insurance is one of the basic needs to protect your device in the future. Those who already purchase mobile insurance for their new phone, they have some idea about how mobile insurance works. However, many of the mobile users or customers are there who do not have any idea about how the insurance of mobile phone works.

Depending on this need, we are going to discuss the complete details about how mobile insurance works while we are going to purchase any phone. Now one thing we want to clear that there are many insurance companies, as well as banks are there who provide finance, loan, and insurance while purchasing a new mobile phone. According to the bank or finance companies terms and condition, you can purchase the mobile insurance or purchase your mobile through finance scheme. Moreover, a customer can use their bank debit card or credit card for the easy purchase of mobile insurance from the company. Therefore, there are many things still waiting for you all about the working of mobile insurance in general.  

What is Mobile Insurance?

Mobile Insurance is almost the same as other insurance policies like motor vehicle insurance, gadget insurance, etc. If any customer purchases the mobile insurance for their new phones, then it will cover the cost of repairing your phone if got damaged. It also bears the cost of your phone if you lost it or stolen. The extra protection coverage is also available from a mobile insurance company like Broken Screen, Liquid Damage and any type of Accidental Damage.

Why do we need Mobile Insurance?

After purchasing a new phone, we generally remain very much care about it. The reason behind it is that we do not want the new phone gets damage or loss in any chance. That is why it is needful to purchase mobile insurance for a new phone. The company will return the value of a phone after getting damaged or lost when you have insurance on a new phone. There is no need to take a headache by the phone owner in such condition. You need to claim the insurance with proper reason and proof. The rest will do by the insurance company accordingly.

How do you get the insurance coverage in your device?

While a customer goes into a shop to purchase a new phone, then the retailer will provide straight insurance on your phone. Forgetting the insurance, you need to pay some extra money rather than the cost of the phone. Sometimes the network provider also gives you the insurance with the cheapest option among other mobile insurance policies.

What things covered under Mobile Insurance Policies?

Following things are currently covered under the Mobile Insurance policies. But you need to purchase and apply the insurance with your new phone only. So let us check out the things covered under mobile insurance.

  • Theft or Lost
  • Any accidental Damage
  • Liquid Damage
  • Broken Screen
  • Mechanical Failure
  • Button broken
  • Accessories fault
  • Damage socket or earphones

The cost to repair the above things under an insurance policy within the period will completely bear by the insurance company only.

How to claim mobile insurance from a company?

According to the terms and condition, a user can claim the mobile insurance which he/she lost/stole and broken down their phone. You need to contact immediately with 24 hours to the insurance company after the tragedy happens.

After that, you need to explain the whole thing that what happens with your phone to complete the claim properly. Then follow the instruction given by the insurer to get back the value of the product against the claim.

The company will check and verify the whole things and let you know about the repair, replacement or transfer the value money off your mobile phone.

# Always keep the back up of phone data to the cloud or several ways regularly.

Conclusion:

Finally, we want to tell you that, it is completely your liability to keep your mobile phone safe. So, after purchasing a new mobile phone, you need to buy a good insurance policy to protect your mobile in the future. It is your choice for how many years you need to purchase the insurance for your phone. Minimum a customer can buy 1-year mobile protection insurance and more. I hope the information given here about how mobile insurance works is now helpful to you all. If you are satisfied, then feel free to share with your friends and others as well.

read more
Health

How Erectile Dysfunction happens?

Erectile Dysfunction or ED is a problem generally occurs in Man body. Due to this ED problem, the sexual power of a man became very less. As a result, he will be getting failed to satisfy his partner during sexual intercourse. Depending on this situation today we want to tell you about how Erectile Dysfunction happens in a man body. Basically, there are several reason exist which causes the ED in man’s body. Do not get worried as today we will hold all those reasons in front of you.

Rather than that if any of you facing the same problem, feel free to consult with the doctor now. The proper medication and treatment will surely help you to get reach out from this sexual problem. So without taking more time let us have a look at how erectile dysfunction happens in the human body.

Common Reasons – How Erectile Dysfunction happens? 

ED is a problem for which man lose enough sexual power and can’t able to maintain erect. Any of the system like nerve supply, blood flow, and hormones can be affected by this problem. Now we are going to show you those common and general reasons for Erectile Dysfunction.

·      Physical Causes:

At first, we will talk about physical problems which include many serious medical conditions. Whether the medical condition is serious or normal but if you take proper medication then it will surely cure your sexual problem i.e. ED. Some of the common medical problem which causes ED are High cholesterols, Diabetes, Heart disease, High blood pressure, Sclerosis, Smoking, Alcoholism etc.

·      Medications:

If you regularly used to intake medicines for other diseases then it may cause Erectile Dysfunctions in your body. You should need to consult with your doctor if you are facing problems due to those prescribed medicines. Depending on your health condition doctor will changes the dosage or types of medication. Some of the medicines which cause ED are opioid pain killers, heart medicines, hormone drugs, peptic ulcer medicines, diuretics, drugs of the nervous problem, prostate medicines and many more.

·      Psychological Causes:  

 In some researches, it has been derived that one of the reasons behind ED is Psychological causes. These causes are also considered as primary causes of ED. Some of those psychological causes are Depression, Guiltiness, Anxiety, Intimacy fear. 

·      Riding Bicycle:

Some men used to love in riding a bicycle. In one hand riding bicycle keeps your physical fitted. But those who always ride a bicycle for long hours; they have a maximum risk to face the ED problem. Rather than that, they can face the problems like prostate cancer and infertility too.  

Final Words:

At last, we want to suggest you that this Erection Dysfunction is not your personal problem but it will give tension to your life partner also. Thus it is better to consult with your doctor of your are facing this problem as soon as possible. And keep in mind that stay away from the reasons exists behind the causes of ED. Hope you all are satisfied with the information given here about how erectile dysfunction happens in a man body.

read more
1 47 48 49 50 51 70
Page 49 of 70