close

debjit

Technology

How to Increase Dedicated Video RAM in Windows 10? 

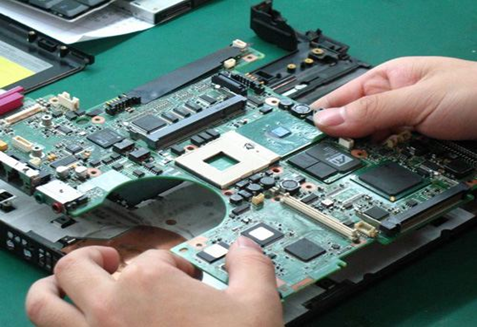
As we know, Windows 10 is the latest version of Microsoft Windows Operating System. The overall performance and the speed of this operating system are much better than earlier. However, we need to prepare our PC in the best way to run Windows 10 well. Depending on this, generally, we use 2GB, 4GB, 6GB, etc. sizes of RAM to speed up our PC according to the processor.  Similarly, we also need to have good capacity of Graphic Card to get the best visual output in our PC Display. Thus, we have two options i.e. Dedicated Video RAM and External Video RAM. Dedicated video RAM is the chip, that remains fixed in the motherboard according to Processor and other component capability. Whereas the External video RAM can be, replaced and attached externally. Here in this topic we will talk about how to increase Dedicated Video RAM in Windows 10.

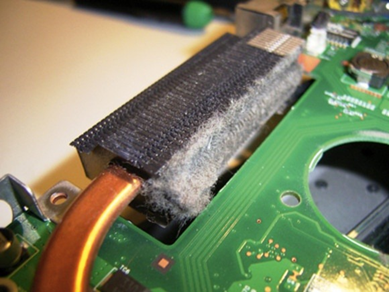
The dedicated video RAM comes integrated with the CPU by fixing the board from the manufacturer unit. V-RAM or video RAM helps us to control the computer Graphics Processing Unit. V-RAM and the Graphic Card are eventually responsible for displaying the objects and pictures on the screen properly. It also helps to increase the Video and the gaming quality largely. The system to increase the dedicated video RAM is a little much tricky but you will find it easy after reading this topic. You have either NVIDIA ATI or INTEL graphics in-build in your PC, still, the process to increase the size of RAM is almost similar to all. Sometimes according to the version of the Operating system, the process to increase the RAM is getting changed to some points. Here in this topic we will show you how to increase dedicated Video RAM in Windows 10.

Proper Guideline: How to Increase Dedicated Video RAM in Windows 10?

 If some of you have knowledge about increasing the dedicated video RAM in Windows 10 then it is Ok. However, if you do not have any idea then follow the steps, which are given below to increase the size of your installed graphics on your PC.

Step 1: At first start up your PC and make sure you are using the latest version of Windows 10. Besides that the Graphics driver should be properly installed in your PC to receive the proper output after increasing the RAM size.

Step 2: Now in this step, you need to press the Windows + E, keys simultaneously. Thus, it will help you to open the file explorer instantly on your PC. Next to it, click on This PC or My Computer, which is present on the left side of your screen.

Step 3: After getting into the My Computer, here you need to right-click your mouse and the menu will appear on the screen. Here choose the last option i.e. the properties and it will open the next window.

Step 4: From the Properties window, you need to choose the Advanced System Settings option, which is present on the left side of that screen. Sometimes the PC also needs the administrator’s permission to access the settings. So press the OK button from the pop-up window if needed and continue further.

Step 5: After opening the advanced system setting, now from the tab choose the Advance tab, which is available with another tab on the top of this screen.

Step 6: In this tab, you are required to click on the Settings button, which is available on the label of Performance.  

Step 7: Thus, the Performance settings will be displayed on your PC screen. This setting will allow you to change the graphical performance and another setting on your PC. Again, on the Performance Options Window, you need to choose the Advanced tab from the top of the screen. This option is present next to the Visual Effects menu tab.  

Step 8: In this step, you have to choose the Change Button, which is present under the Virtual memory label of the same windows. Now it will navigate you to the next window and you will need to change some settings there.

Step 9: At first uncheck the first option, which is written as, Automatically manage paging file size for all drives. After that, some of the options will get highlighted and customization will be allowed now.

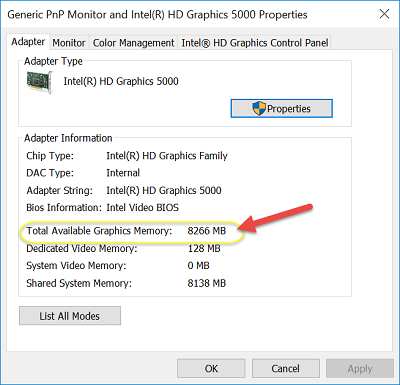
Step 10:  Select the secondary drive, which is present next to the C: drive. Then click on the Custom Size bullet option. Now set up the Initial Size and the Maximum size of the virtual memory according to your needs. If you are getting an error in increasing the memory size then change the parameter and input high memory if it is less. The memory size should be optimum according to the requirements of your PC.

Step 11:  Finally click on the Set button, which is present on the bottom of the Windows, and you are done now. Now it is recommended, that you restart the PC after making the changes to apply and see the effects on your Screen and PC.           

Conclusion:

Finally, we want to tell you that these are all about the topic how to increase dedicated Video RAM in Windows 10. Hope you all are satisfied with the information, which are given here to completing your need. This is very much sensitive and tricky process to extend the dedicated or integrated memory in your PC. Be sure you are providing the proper memory size while increase the memory from the Virtual Memory option. Otherwise, you can also contact to the expert who generally do these types of technical work related to PC. This is the recommended process and technique to upsize the V RAM of your PC. If you find any other process then it is OK and you can also go through that too. If you are happy with the total information given here then feel free to use it in your PC and also try to share it with your friends too.     

read more
Technology

How to disable CMD?

First, we want to tell you what is CMD. The main meaning of CMD is a command line interpreter (CLI) to execute commands and variously operate through this interface. The operation is mainly implemented through the Windows 32 console. Early time the same thing is coming with the name DOS. Here we will show you the process hof ow to disable CMD on your Windows PC. Actually, the CMD is also known as a command prompt in general. This command prompt or CMD comes by default with Windows Operating System. Normally user has no need to disable this command prompt interface.

But still, if some of you want to disable and re-enable it on your PC then also it is available for you. To perform this operation you need to follow some steps one by one. Some of you may know about those steps very well. Still, besides that, some of the users do not have any idea to disable CMD or command prompt console in your Windows PC. Depending on this situation today we want to provide you the total information to disable CMD on your PC by applying some simple steps. Let’s start to do this operation by following the points below.

Step-by-step process how to disable CMD on Windows PC?

As we already told you earlier there is no need to disable CMD in a PC generally. But still, sometimes you may require disabling it due to many reasons. Thus you must know the process for disabling the CMD feature on your system. There are a total of two recommended ways available through which you can able to disable CMD. They are:

  1. By using the group policy editor
  2. By using the registry editor

Ø  How to disable CMD by using Group Policy Editor?

First, we will discuss the process of disabling the CMD using a group policy editor. This is an inbuilt application through which you can disable and enable your CMD console. Follow the steps discussed below for disabling CMD using the group policy editor.

  1. First, Make sure that you have administrator rights to makes those changes in system files or application. If you are a local user then try to log in to the PC using Admin account ID and password. OR you may contact your device administrator for more.
  2. Then after logging in to your PC press Win + R to open the run Window. Otherwise, you can press the Start button and then type the keyword Run in the search box. Hence the application will display and you need to click on it to open it.
  3. Now type the command gpedit.msc in the search box of the Run Windows and hit Enter button.
  4. Thus the local group policy editor will open on your screen where it will show you the entire System file in every folder. 
  • From the left side of the editor window navigate through the folder User Configuration>>Administrative Templates>>System and choose the option Prevent access to the command prompt by double clicking on it from the right side of the Window.  
  • By this operation, the policy window will open to make changes in the settings of CMD. Here choose the button Enabled and click on the Ok button. If you want to disable the command prompt script processing option then choose Yes from the drop-down menu under ‘Disable the command prompt script processing also?’
  • Now after making the whole changes, the command prompt will be disabled on your PC until you re-enable it again.
  • Now when you open the Command Prompt Interface, it will show you that ‘The command prompt has been disabled by your administrator’.
  • If you want to re-enable the CMD on your PC then on the same process you can choose Disable first and then choose No for script processing and make the changes on policy settings.

Ø  How to disable CMD by using the Registry editor?

The process is to disable the CMD by using the Registry editor window. Sometimes it is found that there is a problem coming while you want to open the group policy editor on your PC. In that case, you can also use the registry editor to disable the CMD interface console. Know the process to disable the CMD using the registry editor window.

  1. First, Make sure that you have administrator rights to make those changes in system files or applications.
  2. Then after logging in to your PC press Win + R to open the run Window. Otherwise, you can press the Start button and then type the keyword Run in the search box. Hence the application will display and you need to click on it to open the same as like previous one.
  3. Now type the command regedit in the search box of the Run Windows and hit the Enter button.
  4. Once the Registry Editor Window has been opened, now navigate to the folder as HKEY_CURRENT_USER\Software\Policies\Microsoft\Windows\System.
  • If you did not find the folder Windows or System then create them here.
  • Now you will see that the default value is set to ‘0’ for ‘DisableCMD’ which means that the command prompt is enabled for all users on this PC.
  • Now you need to change the value data by double clicking on the option ‘DisableCMD’ and setting the value to ‘2’. Again if you want to stop the script processing then set the Value data to ‘1’.
  • If there is no specified value then create one Dword value with the name ‘DisableCMD’ as the value you require.

That’s all about the two main recommended process how to disable CMD using the group policy and registry editor. Both the processes are an application for Windows PC to disable the CMD as our need. In the same process, you can enable the CMD again using the existing value. Besides these processes, if you want the simple one then choose any recommended app locker to disable using the CMD on your PC. Hope you all are satisfied with the information which we have provided here for disabling the command prompt interface.


read more
Technology

How to Fix ‘System_Service_Exception’ Windows 10?

Showing the ‘System_Service_Exception’ error is so much common in the maximum no. of PCs. But it is not a big problem as it may be due to some simple errors only. If the error continues for a long period of time then it may harm your Operating System or other system software as well. Before converting this simple problem into a major type of problem then try to cover up as early as you can. No need to worry as there are many processes available to reach out from this problem.  More the main symptom of the System Service Exception is that it will suddenly show you the blue dead screen at start-up or in between operations. The error is written on the blue screen like “SYSTEM_SERVICE_EXCEPTION”. 

Here we will tell you about the process that how to fix ‘System_Service_Exception’ in Windows 10 PC. This is very easy to perform the steps required to apply for every process. This Windows error is seen in any Windows version. But here we are showing the fixing processes against this error which are applicable for Windows 10 only. Let’s start to discuss the fixing methods in the points below.

Guide – How to Fix the ‘System_Service_Exception’ error in Windows 10?

This is the complete guide to getting to know about the processes to fix the System_Service_Exception error in Windows 10. Go through the process steps discussed below and apply the same on your PC if you facing the same problem. 

Process No.1 – Uninstall Antivirus: (Mainly McAfee)

If your system is protected by any anti-virus, then once disable or uninstall the Antivirus program from your PC. It is strongly recommended that if McAfee antivirus is present then positively uninstall this program from your PC. To uninstall the Antivirus then you need to click on the Start button menu and here you need to type Control Panel. Click on the Control Panel icon and the control panel window will open.  Now on that menu, you need to open the category Uninstall a Program and thus another window will open. On that window, you will get the list of installed programs on your PC and just right-click on the selected program which you need to uninstall. That’s it you are done now.

Process No. 2 – Disable your Integrated Web Cam:

The next process is to disable the integrated webcam which is attached to your PC. The webcam which is built in with your monitor may cause the error System_Service_Exception. To perform the disable process you need to click the Windows+X   and then the Device Manager window will open. On that Window, you need to find the Webcam software and just right-click on the option. When you right-click on the name of Webcam software you will find the Disable option which you need to click once. Thus the Webcam software will disabled on your PC.

Process No. 3 – Uninstall Selected Software and services:

Here we will list out some names of software and services that you need to uninstall or turn off to reach out from the System_Service_Exception error. Here is the list of that software and services, if any one of them is currently installed or turned on in your PC then Uninstall or turn off it now.

Uninstall –

If your system has ‘Virtual Clone Drive’ installed then please uninstall it once in order to fix this error problem.

Next, if you’re PC has ‘Xsplit’ installed and you are getting a System_Service_Exception error while playing games then Uninstall Xsplit once.

Remove or Turn OFF-

You need to remove Bit Defender, Cisco VPN, and MSI Live Update features from your PC to fix the Windows error. Once you need to remove all these programs in order to check that the error is fixed or not.

Final Words:

So that’s all about the processes to fix the SYSTEM_SERVICE_EXCEPTION error. If you use all these processes then this is for sure anyone will surely work for you. At last, we want to recommend another tool i.e. Reimage Plus which you need to download once and install on your PC. After that run it on your PC and it will fix all the internal Windows errors present in your PC.  Hope you all are satisfied with the steps that we have discussed above to reach out from the System Service Exception error.

read more
Social

How to download stories on WhatsApp?

A new gift for WhatsApp users is ‘WhatsApp Status’ which was introduced on its 8th birthday. The status or stories of WhatsApp are almost like the stories of Snapchat.  Thus by replacing the boring text status of WhatsApp, you can able to put photos and video stories as well. This feature helps WhatsApp users to download stories from WhatsApp with ease. Here in this topic, we are going to tell you ‘How to download stories on WhatsApp’ properly.

When someone has uploaded the stories then it will remain in status for 24 hours. After that, it will automatically be deleted from the status menu. By default, there is no way to download your friends and family status directly in your phone gallery. However, you can able to make this thing possible with the help of “Story Saver for WhatsApp”. This app is easily available in Google Play to download free and install on your phone. In every way, this app is very useful for downloading WhatsApp stories on your phone.

How to download stories on WhatsApp using “Story Saver for WhatsApp?” 

As we already informed you all normally in WhatsApp there is no way to download anyone’s stories. But, using the application ‘Story Saver for WhatsApp’ helps you all to save the story videos and pictures easily in your phone’s gallery.

Let us have a look how to download and install ‘Story Saver for WhatsApp’ to save the picture and video stories on WhatsApp.

  • The first step that you need to follow is downloading the “Story Saver for WhatsApp” from Google Play. For that, you need to open the Google Play Store from your Android mobile and type the keyword ‘Story Saver for WhatsApp’ in the search box. The preferred app will be displayed and you need to click on the ‘Install’ button to start downloading. Now, wait for the app to complete the download and installation process on your phone.
  • After successfully installing this app on your phone, now follow the next step to go forward. Please try to maintain the total sequence while doing the same operation on your phone through this app for downloading the stories.
  • Now open the installed application by clicking on the launcher icon created in your app drawer or home screen.
  • When you open the app, it will ask you to grant permission to access your WhatsApp data through this app. So, your work is to grant permission to access all the data from your WhatsApp app by the Story Saver for WhatsApp. Now the new app will grab all the story data from your WhatsApp and start to display on its own screen. 
  • Then the main dashboard of the app will display on your screen where you can find the tabs to do the operation.
  • If you want to download the Image stories then click on ‘New Images’ choose the preferred image and click on the download icon to save the Image. In the same way, if you want to download the Video stories then click on ‘New Videos’ choose the preferred video, and click on the download icon to save the Video in your phone gallery.  
  • You can also view the downloaded images and videos instantly from the app by clicking on the ‘Image’ and ’Video’ buttons. In this way, you can able to download the stories in your gallery successfully without any problems.

This is one of the best WhatsApp story savers, which you can use if you want to save any of your friends or family member’s stories on your phone. You can get many other features like downloading all stories from a single contact, viewing recent stories, forwarding or reposting the same status, and much more. Besides that, there are many other apps available in Google Play for free to use for the same purpose. Some of those apps are Status Saver for WhatsApp, Status Downloader, and Status Downloader for WhatsApp, etc. 

Final Words:

At last, we want to tell you that ‘Story Saver for WhatsApp’ is a useful app for downloading WhatsApp stories. But, this app comes with ads which may make you sometimes while using it for your needs. Rather than that there is no other problem arising from this app on your phone. Hope you all are satisfied with the information given her about How to download Stories on WhatsApp. Many of you are not familiar with this procedure but now you can use this app to download stories at any time in and ease. This app is too light and it does not occupy much space on your phone after installation. You just need to keep free space for saving the image and video files of the storied that you have downloaded through this app.

read more
Technology

How to fix the issue laptop overheating and shut down?

How Do You Know Your Laptop Is Overheating and have a chance to sudden shutdown?

A sure sign that your notebook gets too hot is when your fan always runs at maximum speed. You may also experience reduced performance because the CPU cuts back its clock speed to escape heat pressure. Moreover, the fail-safe software may trigger a sudden shutdown to prevent hardware damage.

When your computer randomly shuts off it can be quite a disconcerting experience. Most people will first look to their power source, whether they are connected perfectly or not. The fact of the matter however is that the computer is much more of a marvel than most people realize, such as having a built-in self-protecting mechanism that shuts off a computer if any of the components get too hot. It’s usually in your best interest if it shuts down, as it likely shutting down to protect your computer from some impending danger.

One of the first and most likely reasons your computer is shutting off randomly, especially when you’re playing a game, is an overheating issue. This is the bane of most computers, especially laptops since the heat has nowhere to go.

Another common reason for a random shutdown of your computer is a hardware component failure, which is not common, especially on computers that have been refurbished. If you’ve recently added any new hardware this is the time to remove it to see if the shut-down issue goes away.

If you’re a gamer and your computer shuts-down while you’re playing a game at the above usual performance settings. Many games require chargers with higher voltage capacities, with the preferred voltage from 100w to 240w. However, most computer users don’t realize this and instead use chargers that are 90 watts or less.

How Can You Prevent or Fix an Overheating Sudden Shutdown of a Laptop?

1. Fix Internal Cooling

The first and most important thing you need to do when your laptop is overheating is to clean the fan that provides cooling to the CPU and graphics card. Over time they build up layers of dust and dirt that slow them down and block the flow of air. Consult your laptop’s manual or manufacturer to find out how you can open the laptop to access and clean these parts.

Before you attempt to do any cleaning follow these steps:

  • Shut down the computer.
  • Remove the battery.
  • Unplug the power strip.
  • Ground yourself.

Carefully clean the fan with a cotton swab dipped in a drop of spirit. Make sure the spirit has completely evaporated before you reconnect the laptop to the power. You can also use a vacuum cleaner to remove the dust and dirt that clogs up the fan. To prevent damage to the fan, do not let it revolve in the wrong direction. If you want to use canned air to clean the fan, keep the fan by holding it down.

2. Keep The Laptop On a Hard & Flat Surface

Most laptops suck in cooling air through their bottoms. If the laptop sits on an uneven surface like a blanket, pillow, or your lap, the flow of air into the laptop is disturbed. Subsequently, the cooling is not optimal, heat builds up, the surface becomes hot, the temperature of sucked-in cooling air increases, and eventually the laptop overheats.

This scenario is easily avoided by keeping the laptop on a hard and flat surface. You can use something as simple as a tray or get a special laptop holder or lapstand.

3. Use A Laptop Cooler

Laptop coolers are meant to provide additional cooling. However, getting the wrong cooler can actually make the problem worse. Before you purchase a cooler, you need to understand the flow of air into and out of your laptop. As mentioned above, most laptops suck in air for cooling from the bottom. This makes sense because warm air rises upwards. However, a cooler that sits underneath the laptop and sucks air away from it, does not contribute to laptop cooling and rather causes a more rapid overheating.

If your laptop has intake grills at its bottom, purchase a cooler that blows cool air upwards, i.e. into the laptop. You can also get a passive cooler that does not consume power and merely absorbs heat.

4. Do Not play Heavy Memory Games

We have randomly noticed that in recent days young generations eventually used their laptops in playing games for a long time. Even they used low-configured laptops i.e. having low RAM size and low disk space for playing high memory consumed games. So if they regularly use their laptops by playing these types of games then day by day their laptops will have overheated and may cause sudden failure to the hardware parts.

5. Service

Always keep in mind that regularly after a certain period of time you should do the proper service and maintenance of your laptop from an Authorised Servicing Centre.

# Points to be Noted

  • Always power off your Laptop while not in use.
  • Do not use your Laptop for a long period of time.
  • Always disassemble the Laptop from a trained Professional.
  • Do not try to open a Laptop at home on your own.
  • Try to service your laptop from an Authorised Servicing Centre.


read more
Finance

How to use Paytm Wallet?

Paytm is an Indian company which is situated in Noida from the past. The parent organization of Paytm is One97 Communications. At Early Paytm only allows you to pay your mobile bills, electricity bills, book movie tickets, flight tickets, etc. But recently Paytm has provided us the online shopping and other facilities from their official sites only.  If you recharge your Paytm Wallet using any promo code or directly transfer money from your bank account. Here on this topic, we will show how to use Paytm Wallet for your needs.

Paytm Wallet is a digital wallet where you can able to store money from your bank account to buy items or make transactions through their platform. For various purposes, you can able to use the money from the Paytm Wallet. Some of you may know about Paytm Wallet if you currently using their services. But those who have no idea about it, can follow the below point to get know how to accept and send money in Paytm Wallet.

Complete Guide – How to use Paytm Wallet? 

Now we are going to provide you with a complete guide about how to use Paytm Wallet for making transactions and other operations too. Follow the below steps and apply the same if you also want to use Paytm Wallet at any time.

  • To make cash-free transactions, first, you need to open the site Paytm from your desktop or download the smartphone app on your mobile.
  • After opening the site or app on your device, set up your Paytm Account first using your mobile number and email account. After that verify your account following the on-screen instructions given by the site.
  • Now click on the Wallet icon or menu from the dash screen and add some amount of money according to your need. For adding the money you can use the methods of Net Banking, Debit Card, Credit Card, Promo Codes, etc.
  • If you want to send money to others then click on the ‘Pay’ or ’Send’ option from there.
  • Besides that, you can also make payments to bank accounts or others on Paytm by scanning the QR codes instantly.
  • After the money is loaded into your Paytm Wallet, now you can use it in many segments.
  • You can purchase goods from the Paytm online store, pay the Mobile/Electricity bill, Book Movie/Bus/Flight tickets, etc. and much more.

Image result for paytm wallet

How to accept and send money in Wallet?

Both the process to accept and send money in Paytm Wallet is quite different from each other. That is why in the points we listed out the proper procedure to accept and send money in Wallet.

Accept money is Paytm:

Do the following steps to accept money in Paytm Wallet.

  • First, open the Paytm Site or app on your smartphone or PC.
  •  From the dash screen or the dash screen of Paytm, choose the option ‘Accept Payment’.
  • Now there are three ways available through which you can able to accept the payments or money in Wallet.
  • Debit/Credit Card: If you want to accept money from others via Debit or Credit cards then tap on ‘Accept Debit/Credit card’. Enter the person’s Mobile number and other information related to payment. Tap on ‘Send Payment Request’ and the request will be received on the concerned person’s mobile. If the concerned person accepts or rejects your request, then you will receive one notification in your Paytm also.
  • QR Code: You can accept money from others by requesting them to scan your QR code. Tap on ‘Show Paytm QR Code’ to show the person your QR Code. Take a screenshot of your QR code and send it via email or WhatsApp. If the person is accepted or rejects your request then you will get notified on your Paytm site as well.
  • UPI: Till now the accepting money feature is not available for Paytm. But very soon the process is going to start for Accepting money and sending money in Paytm Wallet.

Send Money in Paytm:

To send money in Paytm Wallet go to the steps given below.

  • Similarly, you need to open the Paytm site or app first on your device. Open the dash screen and tap on ‘Pay or Send’.
  •  Now scan the QR code and enter the amount of money you want to send to the desired customer.
  • After that tap on the ‘Pay’ option to proceed with the payment option.
  • Once the payment is successful or failed, you will get the order summary details as well.

OR

  • After a tap on the ‘Pay or Send’ option, choose the ‘Mobile No.’ Option.
  • Choose the number from your contact or directly enter the number in the desired field.
  • Then enter the desired amount of money you want to send.
  • Tap on ‘Send Money’ to send the money.

That’s all about the process of how to use a Paytm wallet and how to accept and send money in the wallet. Hope you all are satisfied with the information provided on this topic about Paytm Wallet. For practical knowledge, you need to apply the same on the Paytm site if you want the same. Till now Paytm is one of the most popular digital wallet or transaction machines which fulfill all the online payment needs on a single platform. If anyone needs a digital wallet for online transaction purposes then choose Paytm for the best results completely.

read more
Technology

How to increase internal storage of smartphone?

Most of the time it has been found that our internal memory goes out of space. This is a common problem that happens with most smartphone users after a few days. Sometimes some of you manage your files to the external storage and make the internal storage free. However, some users are there who don’t have any idea about the process to free up or increase the internal storage of smartphones. Thus, here in this topic, we will talk about how to increase the internal storage of smartphones very easily.

Almost all smartphones have provided the feature to use an external memory card to increase the phone space. Nevertheless, it is only to extend the external memory space. If you want to increase the internal storage then you need to follow the below steps which are given here only to maintain or increase the phone storage regularly.

Proper Guide – How to increase the internal storage of smartphones?

Now you have reached the proper section that gives you the proper guide to increase the internal storage of your smartphone. Let us have a look at the steps given under every method and apply the same to increase the phone storage.

Method 1: Use the app, GOM Saver:

With the help of GOM Saver, you can easily compress large files like audio, videos, and images in an ease. This Android app is available on Google Play to download and install free. 

  • First, search the app in Google Play and click to install it on your phone.
  • Now open the app GOM Saver from the launcher icon and do not make any changes to its default settings.
  • After that, the app will start to compress the images and videos and you can see how much memory you are saving through it.
  • You can choose the option to delete or back up the original files.
  • Now the compressed file will be saved in your phone memory. After compressing, you can clear about 50% of the space easily. Like if you have early occupied 10GB in your phone memory now it will occupy only 5GB.
  • Thus, you have successfully increased the internal storage.

Method 2: Move data to an External SD card. (Use recovery mode)

The next process to increase the internal storage of your phone is to move the internal memory file into an external SD card via recovery mode.

  • Go to the Google Play and download the Link2SD app. After that, the app will install on your device automatically.
  • Now turn off your phone and go to the recovery mode using the Volume keys + power/Home button. As in recovery, mode touch does not work so you need to navigate using the volume, power, and home button.
  • Now tap on the Link3SD app that is located in your app drawer.
  • From the drop-down list, choose the Advanced option.
  • Choose the Partition SD Card from the advanced menu option.
  • Tap on ext size (size needs to be smaller than your memory card size). Then tap on swap size (size should be zero)
  • Now, wait for a moment.
  • Choose “+++go++” option.
  • Select the reboot option and start the phone.
  • Open the Link2SD app.
  • Click on Allow to give the permissions.
  • Choose Ext2, which will appear in a pop-up.
  • Select the OK option to restart your phone.
  • Again, tap on the Link2SD app and choose the ‘Filter’ icon from the top of the screen.
  • Tap the “On Internal” option.
  • Tap the “option” icon.
  • Tap on “Multi-select-> “Option” icon -> “Create link” option -> “Link application file”-> “Link Dalvik cache file”->“Link library files”.
  • Tap “Ok” and wait for a few moments -> “Ok”.
  • Now you have successfully moved the internal storage file to an SD card and your phone memory is now increased.

Method 3: Remove or Delete Apps Cache Data:

It is very important to keep your phone memory-free by deleting or removing the cache data files. To remove the cache files, you need to follow the below steps.

  • At first tap on the Settings icon of your phone and go to the next step.
  • Scroll down and choose the Storage option.
  • You will now find the Cached Data and tap OK to clear all the cached data successfully.

Method 4: Move Photos and Videos to Google Drive:

This is a common process which may all of you know about it clearly. Still, if anybody has, any confusion then follow the steps to back up your photos and videos to Google Drive to save your phone space.   

  • Open the Google Photos app from your phone and tap on the menu.
  • Now tap on the Settings tab and go to the next step.
  • Tap on Backup and Sync and choose the photos and videos, that you want, to back up now.
  • Now wait for the time the backup process is completed. You can also delete or trash the items, which you do not need further.

Final Words:

Finally, we want to tell you that if you keep your phone’s internal memory more then it helps your phone to run faster than ever. So always, try to follow the above methods to clear the unnecessary files and keep your needed files in your SD card. Hope the topic of how to increase the internal storage of smartphones is now clear to all. If you need the same then feel free to apply the methods in your phone to increase your phone memory as always you want.

read more
Game

Score Hero Apk- A guide to understand:

Introduction-

 From award-winning developers’ first touch famous for the iconic Dream League soccer series comes their latest football game which has over 500 Levels OF FOOTBALL fun as players pass, shoot, and try to score as they grow from a young unheard-of looking to gain a foothold in that ever elusive next stage in their career as they strive to become a football hero of legendary status!

    For Football lovers score Hero is a great game to play. The author of it is first touch games ltd, and it is launched for both Android and IOS. The process for downloading it is very easy, and it takes only 96 MB to play the game.

It’s the best football game with amazing graphics and controls. The game makes you more confident and helps you to improve your real-life football skills.  It is a multiplayer game, so it gives you a chance to play soccer with your mates. If you don’t know anything about football then it’s hard for you to start it. In these cases you should get help from the tutorial, it gives you information to play it.

  • Beginning—- When the game starts, it shows you the warm and benches of the players. You have to join the clubs to play with the ball. Try to don’t use the cash in starting, save it for the difficult times.  If you don’t like to play a full soccer game, then you should play in the different modes. After clearing the simple matches, it becomes hard for you to score a goal or to play. If you want to kick the ball, then make sure that your target is perfect. You should draw the line in a curved manner and move into the corner for the goal.
  • Always make sure to kick the ball to the top of the goal and try to kick harder, because it’s hard for the goalie to jump at the last moment to stop the ball.
  • Score Hero stays football or new and modern soccer that people need to play today. It’s a professional SIM game that offers tremendous possibilities with respect to match flow. Winning games getting three stars in most periods and becoming a star remain a Herculean task.

Features:-

  • Over 500 levels And counting …
  • Win awards, win trophies, score goals, change clubs, represent your country, and go for glory.
  • New score! Engine that allows more freedom and strategic play than ever before.
  • Simple to play, tough to master.
  • Stunning 3d graphics, cut scenes and animations
  • Customize your hero player for a unique look and feel
  • Connect with Facebook to compete against your close friends!
  • Google Play achievements & leaderboards to see who ranks on top.
  • Sync progress between devices with Google Play Cloud/I Cloud!
  • Intelligent all adapts to your passes, and shots making Each play through different. 

How to download & install?  

Score Hero apk downloaded directly by searching from a website Google, Play Store Android Store go to the original link and complete this version.  These apps complete the downloading system after joining google play games.                  

Conclusion:-

With more than 580 levels and amazing graphics, score! Hero is without a doubt one of the most appreciated mobile games for sports fans. On top of that, by implementing some efficient methods for marketing the game, First Touch Games managed to keep users engaged and to continue with this amazing experience even after months or years. And, remember! This isn’t an easy process, knowing that thousands of apps are released every day!

This game is free to play, but additional content and in-game items may be purchased for real money.

This app uses wifi or mobile data (if available) to download game content and advertising. You can disable mobile data usage on this game from within settings/mobile data.

And also this app contains a third party. advertising is disabled if you purchase in-game currency from the shop.

                    That’s all for this post on the Score Hero apk. We have added Each and every information about this apk. If you have any doubt regarding this apk then please let us know in the comment section. our team will restore you soon with a genuine solution to your problem.

      If you liked the post then don’t forget to share this post with your friends and loved ones.

   Stay tuned with us for more such amazing apks.    

read more
Game

Shadow Fight 2 Apk- A complete guide.

Introduction: Shadow Fight 2 is a role-playing martial arts fighting game developed by Nekki. The first version of the game was soft-launched on October 9, 2013, while the game was later released worldwide on May 1, 2014, on both Android and iOS platforms, and on January 27, 2015, it was released on Windows 8 and 8.1. the game was later ported to the Nintendo Switch as a downloadable Nintendo Shop title on September 13, 2018.

Features:- The graphics of the game have a very high quality which gives everyone the enthusiasm and eagerness to engage themselves in a shadow kung fu battle.

  •  Upgrade your fighting skills to win more kung-fu belts and learn more special kung-fu techniques.
  • There are six worlds to choose from and you need to defeat demons there and win the game.
  • Move through these amazing combat sequences because there is now an all-new animation system that has been developed for this latest version.
  • The game is free to download.
  • You can customize your character by purchasing items for its wardrobe and equipment.
  • It includes different fighting skills in kong Fu including kicking punching, and jumping. and this also includes a defensive attack.

Download:- First download the Android emulator software Andy and it is available for free.

Click here to download.

  1. Start the installation of Andy by clicking on the installer file you downloaded.
  2. When the software is ready to be used, start it complete the sign-up procedure, and log in with a Google Play account.
  3. Start the Google Play Store app and use its search tool to search for Shadow Fight 2 download.
  4. Find Shadow Fight 2 and start the installation.
  5. Launch the game and you can now play Sky Streaker on PC  using a mouse or your keyboard and even your touch screen, you can use the control button to emulate the pinch function to zoom in and out.  You can now enjoy this fighting game even without a gadget on your hands and easily make your fighting moves through your computer.

The game looks great. Fighting characters are realistically modeled in 3rd yet are rendered as silhouettes against a variety of moody backgrounds. I am still not certain whether the choice is for the pitch-black foreground. Characters are laziness on the texture artist’s part or an artistic choice, I have my suspicions.

          Shadow was formerly a powerful combatant, but his arrogance led him to defy the rules established by his ancestors, and he opened the gates of shadows. Upon doing so, he quickly realized his mistake, but it was too late, and Shadow lost his flesh and soul and became a mere silhouette of his former self.

Shadow must defeat all the demons and reclaim their seals in order to close the gates of Shadow. After all of the demon seals are collected, shadow from closing the gates once more. After all, demons are defeated in the gates of shadows.

       There is a total of 7 Acts in Shadow Fight 2. Each act has a demon bss to defeat before moving on to the next act. The demons in order are Lynx, Hermit, butcher, Wasp, widow, Shogun, and Titan. Each demon has five bodyguards.  

read more
Technology

Lucky Patcher Apk- A complete Guide:

In today’s world, there are many application that requires  Google authentication and privacy to make an application run distinctly in a android device. Many Android devices require root for such applications to run the patch applications on an Android device. Lucky Patcher is a hacking application and PUP designed for Android devices that are designed to patch applications, create custom patches for applications, or create modified APKs without root access.

Lucky patcher retrieves and analyzes the list of all the installed applications that are present in a user’s Android device provides every instruction and action and indicates the user to carry out the process i.e. including the ability to remove the license verification that is required by Google app store to download the application n to function correctly on the device; modify the associated permissions; extract the apk file to create backup; removing google adds; unlocking paid applications to be downloaded n installed on one or more devices. It is mostly helpful for various games that require permission to run on a device or which are paid applications on the Google App Store, likely the patch application helps the user to remove all the illegality of the apps by making a patch to the Android system by making it functional to work on a android device.

Features of Lucky Patcher apk:

Coming to its features the app possesses many features that require software to perform without providing any illegal content and work correctly without errors. Here are some features listed below:

  • Lucky Patcher searches for an application at startup and shows the application that can be repaired.
  • Lucky Patcher can remove the purchase verification of the application for various applications and games.
  • Lucky Pather can modify many popular games for Android.
  • Lucky Patcher is an all-in-one application that stops boring ads for applications and other contents to interface the user to perform their task easily or play games without interference.
  • Lucky Paper can also remove permissions for applications easily.
  • Lucky Patcher provides different color accents to understand the state of applications.
  • Lucky Patcher can access some tasks easily even if the Android device is not rooted or without root.

How to download and install Lucky Patcher apk?

Lucky Patcher tool is a remarkable hacking tool that allows users to make a pass through any apps and games. The file i.e. the apk of Lucky Patcher tool is easy to download and is small in size and process as well as to install simply. Here are the steps:

Step 1:  Firstly user will have to download the apk file from any website provided by using a browser.

Step 2: Before installing the apk, make sure that you enable the installation unknown source from the setting. for this go to settings>security option>then allow installation of unknown source and make it enable.

Step 3:  Now extract the file and provide a location for the extracted file in the file manager.

Step 4: Locate the file for the file manager. Open the file then click install, and you will find that installation will be started.

Step 5: You will get a warning from the Google app stores which is very obvious to get. Don’t worry about the errors just click the arrows select install anyway and press ok. After a few moments, your installation will be completed.

Conclusion

Concluding about the application users will find Lucky Patcher apk very useful it is an astral a great application that can give gamers a thrill and joy in their gaming experiences. it can be very useful for many users for modifying Android applications creating app backups for further use etc. Though it is free to use your Android device needs to be rooted for it. It can stop boring apps fake Google Play store purchases hack applications and whatnot. It even tells you the permission and instructions required to run the app. People using luccku patcher will never be disappointed or get irritated it is of great use and can be of great task.

read more
1 54 55 56 57 58 70
Page 56 of 70