
At first, we want to tell you that why we need to make Pen drive bootable. As there are many mini-notebooks available in the market which does not come with the DVD drive. Thus in that case, if you want to install the Operating System on your PC you need to install it by Pen drive or by external DVD drive. Maximum numbers of people generally use the bootable software directly to make their pen drive bootable. But do you know that there is another process available through which you can able to make your Pen drive bootable completely.

While you use the bootable software, it is sometimes found that some files get missing while creating the bootable pen drive using the software. Besides without using the software you can create the bootable Pen drive using Command prompt window. The Command prompt console window is generally available in all the Windows PC. Thus user need not get worried while making pen drive bootable without software. So the complete process to make the pen drive bootable using command prompt is discussed below. Without wasting more time let’s start to write about the process in details below.
The Process to make pen drive bootable without Software:
As we already informed you that by using the Command Prompt console we can easily make pen drive bootable without using any extra software. This CMD console process is very much secure and safe thus there is no chance in malfunctioning while you are going to reinstall Operating System in Windows PC. Let’s start to have a look on the steps discussed below.
First Step: Download the Operating System .iso file:
At first, user needs to download the Operating System file on their PC which they want to install after replacing the current Windows. Or if you have already downloaded the Windows .iso file then keep it safely in your drive. Make sure that there is no personal file gets saved in your ‘C’ drive. As this drive will completely get formatted while you install the new Windows.
Now keep ready one Pen drive of Minimum 8 GB capacity or above for best result and process for the next step.
Second Step: Open the Command Prompt Window Console for making Pen drive Bootable:
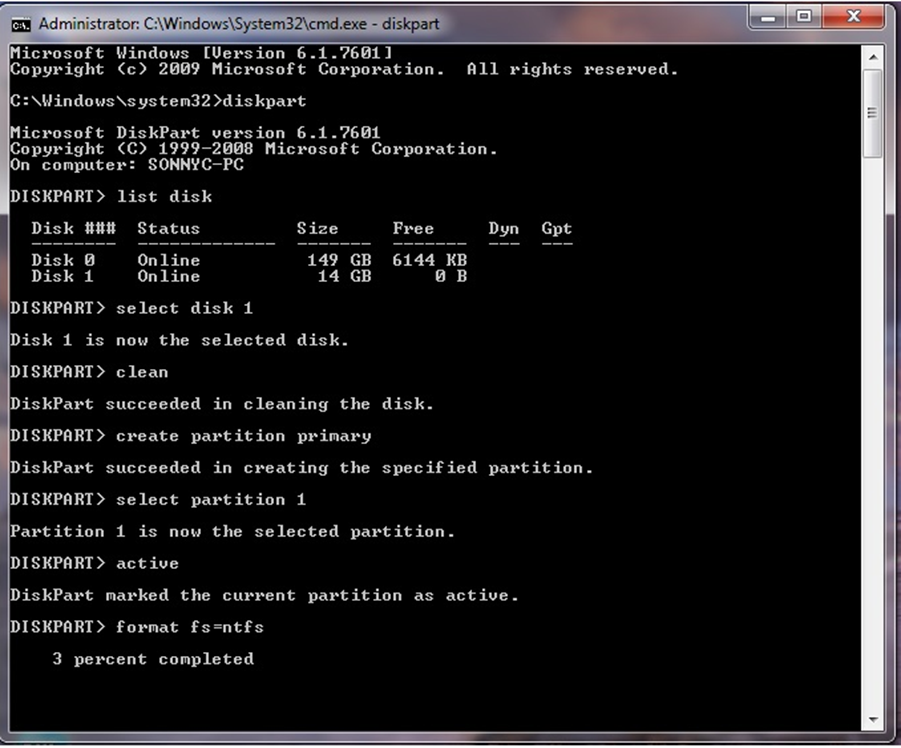
The next step which you need to follow is to open the command prompt console window at first. Make sure you have connected the Pen drive of minimum 8GB in your USB drive. After opening the command prompt window as an administrator, enter the following codes which are described below.
- At first, user need to type the code diskpart and press or hit the Enter button. While you have written this code on the console and press Enter button, it will automatically refer you get the details from the disk drive present or installed as hardware in your computer.
- Now next you have to type the command list disk and hit Enter button. Thus it will list out the available drives with details presently available in your computer. It will also show the total free space available in each drive of your computer.
- Next, you have to choose the Pen drive from the list of the disk drive by entering the command select disk X. Where X is the number of the disk identity allotted automatically by the system to your Pen drive. Like if the disk number is allotted as Disk 1 the type select disk 1 like this.
- Hence the Disk 1, for example, is getting selected successfully.
- In the next step, you need to type the command clean and again hit enter. Thus the pen drive will start to clean its own memory space.
- After successfully completed the cleaning process, try to enter the next command.
- In the command, type create part pri and hit the Enter button. Now the Windows will succeed to creating this drive as the primary partition successfully.
- Now type the command select part 1 and press Enter. Thus it is the selected current partition now.
- Thus now it is the time to start formatting the pen drive by typing the command format fs=ntfs quick and press Enter. The process of formatting will start and thus you need to wait until the whole process to format the pen drive will complete successfully.
- After format, the pen drive then types the command active and press again Enter, which will make the partition active successfully.
- Now type the command Exit and thus the process will complete successfully. Get ready now to proceed to the next step.
Third Step: Copy the .iso file of new Windows:
Now after leaving the command prompt console, directly you have to open the folder where you saved the .iso file of new Windows. Open that folder and find out the image file in which you need to right click once. After right click on this file chooses Open. Otherwise, you can double click on that file to open the files. The internal files will open which you need to copy by pressing Ctrl + A >> Ctrl + C and then directly paste all the files on the Pen drive memory. Or you can open the pen drive and press Ctrl + V.
That’s all after the copying is completed your pen drive is ready to boot your PC successfully. SO you have creates you pen drive bootable in a safe and secure way totally.
So this is the genuine and safe technique to make pen drive bootable without using any software. Hope you all are satisfied with the content which we have discussed here to create pen drive bootable without any custom software. If this topic is sufficient for you then try this method for once while you want to reinstall Windows by making your pen drive bootable.